How To Create Photoshop Actions

Photoshop actions are the best — they save time and make you more productive during post-processing. They can be used to speed up repetitive tasks, make quick work of time consuming edits, and give you a little creative inspiration. In several of my previous Photoshop articles I've given the option to download a set of actions that cover the topics discussed here on the blog.
Want more great projects, amazing photos, Photoshop tips, and articles on photography? Subscribe to Epic Edits today (free!) so you don't miss a thing.
As I mentioned in my “Actions Teaser” post, I'll be going through the basic steps of creating actions and give you some examples of how they can be used. I'm going to rely on my regular readers to fill in any gaps that I might miss, and discuss the Photoshop actions they typically use. So let's get to it — open up Photoshop and follow along!
1. FIND YOUR ACTIONS PALETTE

Before you can do anything, you need to have the right tools in front of you. Make sure that your actions palette is activated and visible. It typically shows up as a tab on the history palette, but this may vary depending on your workspace.
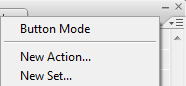
If your actions palette is nowhere to be found, you can activate it under the “Window” menu. Once you do this, you should see a palette similar to the one in this photo. If you don't have any actions defined yet, you'll probably just see the “Default Actions” set.
Sets are a way to group actions as you see fit. To create a new set, pull down the palette menu and click “New Set…”. Give your new set a descriptive name. Also note that when you import and export actions, it's the whole set rather than a single action.
2. CREATE A NEW ACTION
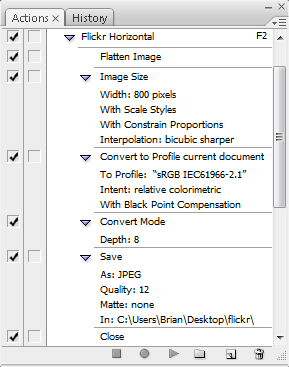
OK, you've got some sequence of events you want to record and you're ready to start the action. As an example, I'll walk through my “Flickr Horizontal” action that I mentioned in the teaser post.
Before we can begin recording the action, we'll need to create the action. Pull down the action menu and click on “New Action…”. Give it a name and a keyboard shortcut if you want. Now we have a new empty action that we can record to.

3. BEGIN RECORDING THE ACTION
To begin recording the action, simply select your action in the palette and click on the “Record” icon in the lower action menu or select “Start Recording” from the pull-down menu. Once you click this button, every event you perform will be recorded. This includes menu items, adjustments, layer selections, and any of the Photoshop tools.

There's no need to hurry through your sequence of events, because the action is not time based. If you're not doing something to the image, it won't be recorded. So take your time and get it right.
4. DO YOUR STUFF
Now do whatever it is that you wanted to do. Perform all the tasks, clicks, option settings, and image adjustments that you want included in your action.
If you mess something up or if you accidentally skip a step — don't worry. After recording the action you can go back and edit the steps, add steps, and re-record steps.
For my “Flickr Horizontal” action, here are the steps I take:
- Save (optional)
Since I'm creating an action that eventually closes the file, it might be a good idea to quickly save the original prior to running the rest of the action. I don't include this step in my action because of long save times for large files, but I could lose information if I forget to save prior to running the action. - Flatten Image
Since I'll be resizing the image, I flatten everything to create a single composite layer. This prevents all of my adjustment layers and whatnot from being scaled separately. - Image Size
I prefer to keep my Flickr photos at 800 pixels on the long edge, so I'll type in “800” in the appropriate dialog field. - Convert to Profile
I work in Adobe RGB, so I need to convert everything to sRGB for the web. - Convert Mode
I also work in 16-bit mode, and JPEGs don't support this. So I switch to 8-bit. - Save As
I didn't like the results from the “Save for Web” option, so I just use a “Save As” now. Here, I specify that the image should be saved in a “Flickr Upload” folder located on my desktop. I don't rename the image, so it retains its original name. I also save at a quality of 12 since there are no limits on storage space with Flickr. - Close
After I save the image, I have no need for it so I close it out.
Some of these events are specific to my personal preferences and my computer's file structure, so if you're following along with my example you'll need to adjust a few values.
5. COMPLETE THE ACTION
So once you're done with the sequence, its time to stop the action. Just press the “Stop” button at the bottom of the action palette and Photoshop will stop recording.
For some actions, this is the end of the road. But many of my actions are set to require input from the user at specific points along the way.
6. SET YOUR TOGGLE DIALOGS
An action with no stop dialogs will run through the sequence of events without stopping or asking for anything. So if you have a step that requires some human input or uses a setting that must be adjusted for each photo, you must tell the action that this is the case. To do this, simply click on the box next to the step and you'll see the icon appear.
When this box is active on a given step in the action, Photoshop will present you with the dialog box pre-filled as specified by the action. You'll then have a chance to make adjustments to anything in that dialog before moving on. Once you hit “OK” for that dialog, the action continues as it normally would.
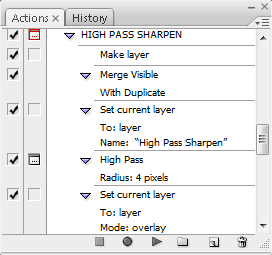
In the example of my “Flickr Horizontal” action, I don't set any stops for the dialogs. I can do this because each time I use it I want to produce the same results. For my other actions such as “LAB Sharpening”, “LAB Saturation”, or “High Pass Sharpen” (as shown in the image above), I set stop points to adjust certain settings that vary between photos.
7. INSERT ANY MENU ITEMS
Inserting a menu item (via the pull-down menu) is similar to recording the action, but it forces a dialog that can't be toggled off. When the action arrives at that menu item, you MUST interact with it to continue. These menu items also have no preset values like the recorded actions do, so you'll get whatever shows up by default.
I personally don't use menu items very often, but they can be useful for certain situations. If you record an action and you find that the presets from the action item are causing more work for you, delete that step and insert a menu item.
8. TEST AND REFINE
I usually don't get my actions right the first time around unless they're extremely simple. I find that if I run a few different Photoshop files through the action, I usually uncover some mistakes or find the need to insert additional steps to ensure the action runs smoothly. If you find a mistake with one of your steps, just select that step and “Record Again” (via the pull-down menu). Or if you want to re-order some steps, just drag them up or down the list until they land where you want them.
I've also noted a few quirks about running actions, such as error messages that can occur if something is not possible to complete. Or the fact that working with multiple files, renaming layers, and selecting layers are cumbersome tasks with actions because Photoshop is looking for specific file names or layer names each time the action is run.
For complex actions, what you'll end up with are a few extra steps that ensure a robust action that can handle many different files. But hey, it's an action — who cares?
IDEAS FOR ACTIONS
So… I think that covers the basics of how to create an action in Photoshop. If I missed something or if I didn't explain something well enough, let me know and we can follow-up in the comments.
These action things are great, but what can you do with them? It can be hard to think of those repetitive tasks when you're not performing them, so I'll share a few of my action needs. I would say that my actions are grouped into three main categories: administrative tasks, specific tasks, and creative boosts. Here are a few of the actions in my arsenal.
ADMINISTRATIVE TASKS
These are things that will drive you nuts because they're no fun at all. Like every time you want to save a JPEG or TIFF file. Or every time you want to downsize for Flickr or email. I use actions to speed up the process and prevent me from making mistakes.
- Resizing and saving for specific destinations
- Basic adjustment layer setups
- Converting color space and bit depth
SPECIFIC TASKS
Actions are good for little items that consist of a few steps. By using an action, it not only bypasses the need to click on menus or type keyboard shortcuts, but it also allows you to set default values that you commonly use.
CREATIVE BOOSTS
These are more of starting points than anything. I use actions for this type of stuff so I can quickly evaluate if a certain technique has any potential with the photo. Often, I'll not only run a few b/w conversions, but I'll also run most photos through at least 3 or 4 other creative techniques in Photoshop and take snapshots of the initial results. This allows me to decide which direction I'm going and I don't have to waste a lot of time getting there.
So all you Photoshop gurus out there, pipe up and give us more examples of what can be done with these things. What are some of your most useful actions that you couldn't live without?
Want more great projects, amazing photos, Photoshop tips, and articles on photography? Subscribe to Epic Edits today (free!) so you don't miss a thing.
Antoine Khater
March 7, 2008Oh Great sum up here Brian. I’m sure a lot of people will greatly benefit from it
Shawn
March 7, 2008Great post! Very useful stuff… especially for me as a Photoshop newbie.
Thanks!
Martin O'B
March 16, 2008One correction: You state that you save at jpeg 12 because Flickr has no limits. Actually, Flickr limits files to 10MB, and will resize it itself if the file is bigger than that.
Brian Auer
March 16, 2008Wow, really? I guess I’ve never run into that since I only upload at 800 pixels.
Marty
March 17, 2008Very useful info – thanks!
Viktor
March 17, 2008thanks!
Brian
March 17, 2008I also use actions a lot. One of the downsides of having a good camera is that the images are way too big (e.g. too many pixels). On our photo album section of the website (before we discovered Adobe’s Photogallery feature!!!), my wife wanted them to be 300 pixels wide. Actions to the rescue!
However, we needed to be able to do them in batches. Here is a tutorial on how to do just that…
https://www.wicketbang.com/pstips.htm
Great post by the way…
Chuck
March 24, 2008You have no idea how many headaches you just saved me and the people I work with. How had I never heard of this before? Ridiculous.
Sarah
April 2, 2008Thanks so much…you really helped me out tonight…sorry I can’t offer anything back!
Kyle
May 17, 2008Thank you for leaving this information for me to learn from. Your tips and presentation on doing photoshop actions has saved me vast amounts of valuable time. You made it extremely easy to understand- so THANK YOU : )
KYLE
Brian Auer
May 17, 2008Hey, no problem! If any of you have any questions about the process of creating actions — don’t hesitate to ask!
Ryan
June 16, 2008Great job, however I have looked hi and low for an answer to this question:
I have an image with two layers. Layer 1 stays put and is locked. Layer 2 moves. I would like to set up an action with in this file where layer 2 moves up 3 pxs then saves as “file_name1″… then does the same action from there saves as “file_name2” … etc.
How do you go about doing that action? Each time I try to write it, the file just saves as the same name. It is really quite frustrating.
Thanks for you help in advance!
-Ryan
Fernando Lopez Jr.
June 18, 2008i want to know how to create an action that detects whether the image is landscape or portrait if this is the case then rotate 90 degrees if not leave alone…
how can i do this?
Thank you.
Brian Auer
June 18, 2008@Ryan file naming with actions can be a tricky thing to do. The best I can think of is to toggle the dialog for the save steps and you’d have to punch the name in by hand for each save. I don’t know if there’s a way to automate that.
@Fernando do you mean something to detect if the photo was taken in portrait orientation? If so, I don’t know that it’s possible. Most newer cameras record this information and automatically rotate them before they even leave the camera.
David Rabkin
July 21, 2008Hello Brian,
The post is great!
I use actions mostly for administrative/resize purposes. I wrote a few actions that realize some interesting technics like noise reduction, woman face, convert black and white. But honestly I use them rarely. I’d like to try yours.
I noticed that you have flickr horizontal action. Probably there is flickr vertical. I’d like to have single action with following condition:
if (width > height)
resize width 800
else
resize height 800
I didn’t find a way to insert the condition to the action. I thought about scripting, but didn’t realize it yet. What do you think about issue?
Thanks again for the great post,
David
Veronika
July 22, 2008nice tut, thank you very much! I have a question though – can I record an action that consist of manually erasing several pixels? I need to erase around 100 pixels out of a tiny png image(s) and I really don’t know how to “force” photoshop to actually record it. My problem is that I have around 30 images where I need to do the exact same thing and I don’t feel like doing it manually on every single one of those pictures 🙁 Can you help?
Brian Auer
July 22, 2008I suppose it would depend on if those pixels are in the same spot and if the images are all the same size. Have you tried recording the erase command? Or perhaps you could try adding a mask and “painting” those pixels out. Also, if the action won’t record correctly, or if the images are different enough that it won’t work, you could create a mask for one image and just copy it to the others.
Brian Auer
July 23, 2008Sure, you should see an option in your palette menu to “Save Actions” (or something along these lines). This will give you the option to save the selected action or set out to a file that you can then “Load” into another installation of Photoshop.
Becky
July 23, 2008This is awesome, and I’ve already made several actions. Can you tell me how to get them from one computer to another?
Thanks so much for all your work!
Matt Beischel
August 11, 2008Nice intro tutorial to the time saving power of actions. Stumbled across it while looking for a good online tutorial to link to for an article I’m writing about using automation to speed up your workflow.
In regards to file naming, use batch processing. It’s under File > Automate > Batch… You pick your action from the dropdown menu, your source folder, and your destination folder. Within the destination options you can set up to 6 filename options, including specific filename (type it in the dialog box yourself), date, serial #, serial letter, or file extension, with several variants of each type. It may take some experimentation on your part to figure out which checkboxes need to be checked; it’s dependent on if you have open/close or save steps in your action. It’s almost like…automating the automation!
Kyle
September 10, 2008Watermarking is my most useful action
ms.Jordan
September 20, 2008Hey.. i love what you have written it’s great! just one question..How do you add in a stop exactly.. where individuals can control something.. i would like to make actions for scrapbooking, I would love for people to be able to add in a “paper” of thier choice or control a fill color.. something along those lines.. if you get what i’m asking and have an answer i would love for you to send me an email if iat all possible at [email protected]
Thanks soooooo much!
Jordan
Brian Auer
September 24, 2008Stops are added via the dropdown menu item called “Insert Stop…”. If you don’t check the box for allowing a continue, the user will be booted from the action so they can do what they need to before continuing. And you can tell them this via the message option in the stop.
Deborah
November 2, 2008I’m using Photoshop CS3 under Windows Vista to resize a folder of images to 300px x 200px. I created an action that
1. opened a file,
2. resized the image using Image >Image Resize
3. used Save for Web to save the image as a jpeg.
4. Closed the image.
Ran the action and the smaller files were created.
However, when I open each processed file in Photoshop, I receive a dialog box that says:
The file contains file info data that cannot be read and has been ignored.
I don’t know what is causing the message to display. Working on a Mac running OS X and Photoshop CS3, I had the same issue with the message displaying when I opened the resized file. Searched online, but couldn’t find any solution.
Any ideas what I’m missing?
Brian Auer
November 2, 2008The only thing I can think of is the “Save for Web” feature causing problems.
“Save for Web” strips out all metadata and EXIF information in attempt to make the file size smaller (though CS4 gives you the option to include the metadata). This is generally not a good idea to throw it out, especially if you embed your contact information or other attributes. Though I’m not sure why Photoshop would be saying there’s extra information that it can’t read.
You might just try replacing the “Save for Web” with “Save As” and see if that helps.
Deborah
November 2, 2008Thanks Brian for the quick response. This has had me puzzled for several days.
When I use “Save As” in the action, I noticed the file size of the photos were in the 100K -120K size, rather than the 30K size for the “Save for Web” option.
Since these photos (over 50) are intended for a web slideshow, I wanted them to be smaller in file size.
Suggestions?
Brian Auer
November 2, 2008Well… if “Save for Web” isn’t hurting anything other than causing an inconvenient warning message in Photoshop — I just wouldn’t worry about it.
If “Save As” is solving your problem but is creating larger files, you might try a couple of things: convert the image to sRGB before saving, and use a “Quality” of 8 or 9. You should be able to come pretty close to the “Save for Web” file size.
Deborah
November 2, 2008Thanks Brian, I’ll give it a try. I’m wondering what others do for website slideshows, when they need to create smaller images that are all the same size to fit a slideshow?
Do most people crop first to maintain the proportions correctly, then resize to a smaller size?
Given I want all the resized files to be 300px x 240px, what do you recommend for a resizing action to ensure I
1. maintain the aspect ratio
2. produce 300px x 240px files
3. produce files that are smaller in file size (in the 30K) range
Brian Auer
November 3, 2008If you want to maintain the aspect ratio, I’d suggest including the crop as part of the action — just fill in the width and height options (but not the resolution) when you create the action (which will resize at the same time), and be sure to toggle the dialog on for that step in the actions panel before you run the action on other photos. During the action, it will stop and let you do the crop, and it should maintain the filled-in dimensions. So once you drag the box and hit enter, the action should continue along its way. Then you could batch the whole thing and whip out a whole set of photos pretty quick.
Julie
November 10, 2008I have PSE 6.0 Do you know how I can add an image/icon to an action? I have some actions downloaded in my PSE folder, but when displaying the actions available they are blank squares. ???
Catriona
December 10, 2008Hi Brian, great tutorial. My question is about copying varying image sizes.
For the first steps, I want to make a copy of the image and then have the action run on the copy, leaving the original alone. The problem I ran into is that the copy command copied the original image’s size and resolution and when I ran the action on subsequent images, no matter what their original size, they were changed to the same size and resolution as the original.
How do I get around that?
thanks,
Cat
elaine
December 15, 2008help, please!
I’m creating an action to open, re-size, then crop a batch of images.
When I “Save As” in the action, and then stop recording the Action, what happens is that all of the images are saved with the name of the image that I crop during the creation of the action.
My goal is to save each new cropped image with it’s original name, and place into a new folder.
What am I doing wrong??
thanks!
Brian Auer
December 15, 2008@Catriona: I’m not sure what might be causing the problem. How exactly are you copying the image? Are you doing a duplicate layer command? That one shouldn’t give any problems with sizes. I don’t know though, it’s really hard for me to diagnose the problem when I haven’t seen or used the action.
@elaine: Make sure when you do the “Save As” command, you don’t type anything into the file name box. Just pick the folder and hit “OK”. This is what I did for my Flickr Resizer actions (as shown in the article above) and they keep the original name of the files.
Ajith Edassery
December 18, 2008Hi Brian & others,
Not sure if this is possible in Photoshop but for my blog’s new design (and for avatars as well) I want to convert my face into a caricature. Is this possible in Photoshop? If so how??
I downloaded a couple of free software but the output is pathetic. If PhotoShop is not the option, please recommend anything that you might know.
Thanks in advance,
Ajith
Catriona
December 18, 2008Thanks for the reply. I figured it out. I needed to add a step near the beginning that trimmed the image.
David
January 22, 2009Thank you. I did not know you could create actions. That is cool.
John
January 23, 2009Brian,
I am glad I found your site. I would like to make an action to size my black and white images for a web page. Most of my images are hugh and need to be resized to open fast on a web page but I want to retain as much quality of the image as possible. I am certain that my process in wrong and I am degrading my image quite a bit. Right now I start with about 40 meg + file and sharpen after final adjustments. Then I resize to 800 and change my res to 90. Then I go to save for web and lower it again to about 100k and save it again. Maybe I should I be lowering the image size in a number of steps to get to 800 and then sharpen at the end and forget about going to save to web. Also would I need to convert to 8 bit gray scale at some point in the proces? What would a proper resizing action look like for what I am trying to do? Thanks for considering my lengthy question. John
Brian Auer
January 23, 2009Check out my Resizer Action and see if you can modify it to suit your needs. Also read through the comments on the post for more ideas on resizing — there’s a built-in Photoshop script that resizes too.
Rachel
February 15, 2009Hi there, love the post…but question…I am trying to make a copyright action to place my copyright on my images before I post them. I go through all the steps but when I play it the text show up all bunched up. Not like I typed it. Any suggestions? Thanks!
Steve de Niese
February 15, 2009Did anyone determine if there was a way to add conditionals to this (such as the if statements)
I’m doing pretty large batch runs for thumbnail generation and the only thing holding me back is when the height is greater than the widths.
Never the less this has still led to saving me a couple hours each week so thank you very much!
Jeff Collins
March 11, 2009When I use "Save As" in one of my actions, it saves the file as the file number I used to create the action. How do I get the action to save each file as the actual file number, rather than the file number from the one I used to create the action?
Albert
April 3, 2009Rachel as for your question, every photo is copyrighted already, however, if you want to legally copyright it, you can charge or sue the opposer using your products. If you don’t buy copy right enforcement for your work, you can’t charge them anything, but you can tell them to stop using your products or else.
Jenny
April 6, 2009Hello,
First of all, awesome post. I usually use actions for resizing, but I never knew how to make my own. So I gave it a go.
I have a picture and made an action that it crops the picture and saves it as a *.jpg, then go back and make another crop of the same size but different part of the picture and save it etc. So basically I’ll end up with tiny squares of my picture whom when put toghether make the entire original picture again.
Now my question; is there a way that when I run the action it’ll ask me the first time it will save in what folder to put it and a name, and the second and so on times it’ll save in that folder and name it "…2" or something?
So for instance when it cropped the first square, I can choose a folder and name it ‘square’ and the next crop it’ll save it in that folder and name it ‘square2’ and so on? So I basically only have to set it once?
If I toggle the dialog on the first one it goes ok, but the next and so on it will put it in the folder I used while making the action, and uses the name I gave it then. If I toggle all the dialogs on on every save, it’s hardly automatic at all. It’ll save me a lot of time if I can get this to work.
Please respond or mail me at [email protected].
I’m sorry if my English is bad (it’s not my mother’s language) or if I did a poor job explaning the situation. Feel free to ask if there’s something you don’t understand.
Many thanks in advance!
JoOosty
April 18, 2009is it possible to make an action that you typ in a name once, and then let the action save it under that name in various folders? and mayby to let it add a 1 or something like that behind it?
DavidJ
June 1, 2009Hello Brian,
Thank you for posting this great article on actions.
Having made some actions or myself, I would like to share them with friends of mine. Could you tell me please where I can find the action files within photoshop so that I can “extract” them, and send them on as an email attachment?
Many thanks in advance for this.
DavidJ
Sean Walker
June 7, 2009Is it possible to create a watermark action with an already created watermark? So instead of recording the process of making a watermark and applying to a photo, can you record opening up the psd file located on your desktop and then applying it to a photo? My friend created a cool watermark for me and now I want to use it as an action to watermark photos.
khushboo
August 14, 2009hi i made a nice photoshop action to automate color fixing, But i dont know how to save it!…i didnt see any save action option on the palette or anywhere else.I want to send it to another computer.
I am sure there is a way as online one can download actions they have a .atn extension
Brian Auer
August 14, 2009I think it’s somewhere in that little pull-down menu at the top right of the actions panel… something like “save actions…” along with an option for “load actions”. Just make sure you have the action or folder highlighted before you hit save.
Julia
September 5, 2009Great post!
I’ve done a couple actions, but how on earth do I share them with friends? Can’t find the files on my computer… Do I have to save in some special way?
//J
Brian Auer
September 5, 2009You have to save them out — you should see an options for loading and saving selected actions in the pull-down menu of the actions panel. This will allow you to save out a .atn file.