How To Create Photoshop Actions

Photoshop actions are the best — they save time and make you more productive during post-processing. They can be used to speed up repetitive tasks, make quick work of time consuming edits, and give you a little creative inspiration. In several of my previous Photoshop articles I've given the option to download a set of actions that cover the topics discussed here on the blog.
Want more great projects, amazing photos, Photoshop tips, and articles on photography? Subscribe to Epic Edits today (free!) so you don't miss a thing.
As I mentioned in my “Actions Teaser” post, I'll be going through the basic steps of creating actions and give you some examples of how they can be used. I'm going to rely on my regular readers to fill in any gaps that I might miss, and discuss the Photoshop actions they typically use. So let's get to it — open up Photoshop and follow along!
1. FIND YOUR ACTIONS PALETTE

Before you can do anything, you need to have the right tools in front of you. Make sure that your actions palette is activated and visible. It typically shows up as a tab on the history palette, but this may vary depending on your workspace.
If your actions palette is nowhere to be found, you can activate it under the “Window” menu. Once you do this, you should see a palette similar to the one in this photo. If you don't have any actions defined yet, you'll probably just see the “Default Actions” set.
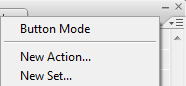
Sets are a way to group actions as you see fit. To create a new set, pull down the palette menu and click “New Set…”. Give your new set a descriptive name. Also note that when you import and export actions, it's the whole set rather than a single action.
2. CREATE A NEW ACTION
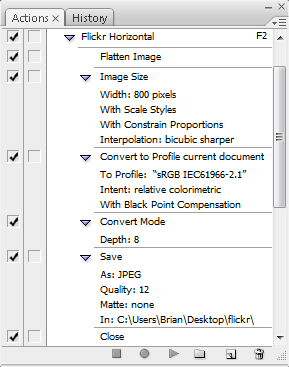
OK, you've got some sequence of events you want to record and you're ready to start the action. As an example, I'll walk through my “Flickr Horizontal” action that I mentioned in the teaser post.
Before we can begin recording the action, we'll need to create the action. Pull down the action menu and click on “New Action…”. Give it a name and a keyboard shortcut if you want. Now we have a new empty action that we can record to.

3. BEGIN RECORDING THE ACTION
To begin recording the action, simply select your action in the palette and click on the “Record” icon in the lower action menu or select “Start Recording” from the pull-down menu. Once you click this button, every event you perform will be recorded. This includes menu items, adjustments, layer selections, and any of the Photoshop tools.

There's no need to hurry through your sequence of events, because the action is not time based. If you're not doing something to the image, it won't be recorded. So take your time and get it right.
4. DO YOUR STUFF
Now do whatever it is that you wanted to do. Perform all the tasks, clicks, option settings, and image adjustments that you want included in your action.
If you mess something up or if you accidentally skip a step — don't worry. After recording the action you can go back and edit the steps, add steps, and re-record steps.
For my “Flickr Horizontal” action, here are the steps I take:
- Save (optional)
Since I'm creating an action that eventually closes the file, it might be a good idea to quickly save the original prior to running the rest of the action. I don't include this step in my action because of long save times for large files, but I could lose information if I forget to save prior to running the action. - Flatten Image
Since I'll be resizing the image, I flatten everything to create a single composite layer. This prevents all of my adjustment layers and whatnot from being scaled separately. - Image Size
I prefer to keep my Flickr photos at 800 pixels on the long edge, so I'll type in “800” in the appropriate dialog field. - Convert to Profile
I work in Adobe RGB, so I need to convert everything to sRGB for the web. - Convert Mode
I also work in 16-bit mode, and JPEGs don't support this. So I switch to 8-bit. - Save As
I didn't like the results from the “Save for Web” option, so I just use a “Save As” now. Here, I specify that the image should be saved in a “Flickr Upload” folder located on my desktop. I don't rename the image, so it retains its original name. I also save at a quality of 12 since there are no limits on storage space with Flickr. - Close
After I save the image, I have no need for it so I close it out.
Some of these events are specific to my personal preferences and my computer's file structure, so if you're following along with my example you'll need to adjust a few values.
5. COMPLETE THE ACTION
So once you're done with the sequence, its time to stop the action. Just press the “Stop” button at the bottom of the action palette and Photoshop will stop recording.
For some actions, this is the end of the road. But many of my actions are set to require input from the user at specific points along the way.
6. SET YOUR TOGGLE DIALOGS
An action with no stop dialogs will run through the sequence of events without stopping or asking for anything. So if you have a step that requires some human input or uses a setting that must be adjusted for each photo, you must tell the action that this is the case. To do this, simply click on the box next to the step and you'll see the icon appear.
When this box is active on a given step in the action, Photoshop will present you with the dialog box pre-filled as specified by the action. You'll then have a chance to make adjustments to anything in that dialog before moving on. Once you hit “OK” for that dialog, the action continues as it normally would.
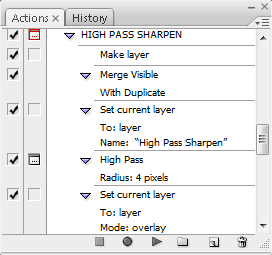
In the example of my “Flickr Horizontal” action, I don't set any stops for the dialogs. I can do this because each time I use it I want to produce the same results. For my other actions such as “LAB Sharpening”, “LAB Saturation”, or “High Pass Sharpen” (as shown in the image above), I set stop points to adjust certain settings that vary between photos.
7. INSERT ANY MENU ITEMS
Inserting a menu item (via the pull-down menu) is similar to recording the action, but it forces a dialog that can't be toggled off. When the action arrives at that menu item, you MUST interact with it to continue. These menu items also have no preset values like the recorded actions do, so you'll get whatever shows up by default.
I personally don't use menu items very often, but they can be useful for certain situations. If you record an action and you find that the presets from the action item are causing more work for you, delete that step and insert a menu item.
8. TEST AND REFINE
I usually don't get my actions right the first time around unless they're extremely simple. I find that if I run a few different Photoshop files through the action, I usually uncover some mistakes or find the need to insert additional steps to ensure the action runs smoothly. If you find a mistake with one of your steps, just select that step and “Record Again” (via the pull-down menu). Or if you want to re-order some steps, just drag them up or down the list until they land where you want them.
I've also noted a few quirks about running actions, such as error messages that can occur if something is not possible to complete. Or the fact that working with multiple files, renaming layers, and selecting layers are cumbersome tasks with actions because Photoshop is looking for specific file names or layer names each time the action is run.
For complex actions, what you'll end up with are a few extra steps that ensure a robust action that can handle many different files. But hey, it's an action — who cares?
IDEAS FOR ACTIONS
So… I think that covers the basics of how to create an action in Photoshop. If I missed something or if I didn't explain something well enough, let me know and we can follow-up in the comments.
These action things are great, but what can you do with them? It can be hard to think of those repetitive tasks when you're not performing them, so I'll share a few of my action needs. I would say that my actions are grouped into three main categories: administrative tasks, specific tasks, and creative boosts. Here are a few of the actions in my arsenal.
ADMINISTRATIVE TASKS
These are things that will drive you nuts because they're no fun at all. Like every time you want to save a JPEG or TIFF file. Or every time you want to downsize for Flickr or email. I use actions to speed up the process and prevent me from making mistakes.
- Resizing and saving for specific destinations
- Basic adjustment layer setups
- Converting color space and bit depth
SPECIFIC TASKS
Actions are good for little items that consist of a few steps. By using an action, it not only bypasses the need to click on menus or type keyboard shortcuts, but it also allows you to set default values that you commonly use.
CREATIVE BOOSTS
These are more of starting points than anything. I use actions for this type of stuff so I can quickly evaluate if a certain technique has any potential with the photo. Often, I'll not only run a few b/w conversions, but I'll also run most photos through at least 3 or 4 other creative techniques in Photoshop and take snapshots of the initial results. This allows me to decide which direction I'm going and I don't have to waste a lot of time getting there.
So all you Photoshop gurus out there, pipe up and give us more examples of what can be done with these things. What are some of your most useful actions that you couldn't live without?
Want more great projects, amazing photos, Photoshop tips, and articles on photography? Subscribe to Epic Edits today (free!) so you don't miss a thing.
Mark W.
September 29, 2009Brian…very helpful post, thanks!
Question: I need to buy a photoshop program capable of very simple actions for volume production: Resize/Sharpen/File
What is the most cost effective version available. I know CS4 will have actions…but is it available on any other programs for less money? I’m not much of a computer guy so it needs to be the simple approach!
Thanks, Mark
Brian Auer
September 29, 2009You might be able to get by with Lightroom using Presets rather than actions… not entirely sure though since I don’t use it. The GIMP might also have similar capabilities to Photoshop, but I’ve never used it.
Daus
September 30, 2009Hi, Brian
I want to ask something..
I’ve make a new action and I’ve completed my stuff, but I can not save my action..
How to save the action that have been created?? thanks..
Brian Auer
September 30, 2009Select the action set in the actions panel — click the pull down menu — “Save Actions…”
dptalk
October 3, 2009I dont see a “actions” window in my photoshop CS4. How do I make it visible.
Brian Auer
October 3, 2009Main toolbar >> Window >> Actions. Or Alt+F9
Aaron
October 31, 2009is there a way to hotkey this, so that i can perform an action at the push of a button?
Emily
December 9, 2009i am trying to create an action but i want it to all happen within one file. i want to take 10 jpgs (all in one folder), place them one at a time into a separate layer and then save the photoshop file so that this one file with all 10 jpgs in it in their own layer.
any suggestions?
thanks
Brian Auer
December 9, 2009Start recording, start a new file of sufficient dimensions (ctrl+n), create a new layer (ctrl+alt+shift+n), file >> place, pick the file, set the scale, hit the check box. Continue 9 more times. save. stop recording. Then go back to your action and toggle the diaglog thingy on the place and save commands. this will let you choose any file rather than the ones you used to create the action.
appy
January 4, 2010Will an action created using the English version of the Photoshop will work with the German version of Photoshop?
Brian Auer
January 4, 2010I don’t see why not, but I don’t have any way to verify that. Try downloading and using this action I created: https://epicedits.com/2008/12/23/flickr-resizer-photoshop-actions/
Arman
January 13, 2010Thanks Brian it’s very informative specially for beginners like us.
Bull Rhino
February 7, 2010Very nicely done tutorial on how to record an action. I had never done one before, and put this one off for a while afraid I couldn’t make it work. The one I did was a very simple process that puts a shadow and blurry copy of the same photo around the photo to frame it. It worked perfectly the first time and now I can do in less than a second what it used to take about a minute. Not that that is a big deal, but it sure helps.
Thanks so much for a much needed tutorial!
Scott at The World’s Best Photography Blog 😉
charlie1986
March 9, 2010hi,
I recently did an action, cs3 crashed and i lost action before managing to save, is there anyway i can retrieve it? very gutted! please help
KattC
April 14, 2010Thanks a lot! This is a really helpful tutorial! I’m so glad I discovered this that I finally knew how to save more time in placing effects on my pictures. Thanks again! More power! 🙂