Photoshop Technique: LAB Saturation Adjustments
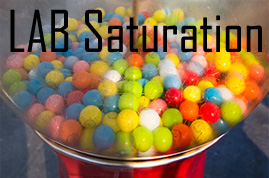
Saturation is one of those things that we tend to either ignore or overdo. In some color images, it's the actual colors that account for the interesting-factor — and in those cases, saturation processing is very important.
I have the sneaking suspicion that most of us (yes, I'm at fault too) will use an RGB saturation adjustment layer (or an ACR adjustment) to boost the color saturation. This is probably OK for very small adjustments on the order of less than 5 or 10%. Once you go beyond that, you'll start clipping the color highlights and end up losing tone details and textures.
But have no fear, there is a better way! The LAB (Lightness, A, B) color mode is quite useful for making higher quality adjustments to the saturation. I'm guessing that most will avoid LAB editing because it seems less intuitive, or because there's no immediate need to use it. In reality, it's no more difficult to use than the RGB color mode. So if you have an image that's begging to be saturated, try out this technique and I'm certain you'll find just how powerful it can be.
I've put together a Photoshop action that might help speed up the whole process. Laziness is usually why I'll opt for the RGB saturation method vs the LAB method, so this action should make the process less tedious. Just apply any touch-ups or adjustment layers to your original image like you normally would, select the top layer when you're ready to bump your saturation, and run the action. This action basically takes care of everything, but it gives you the ability to adjust the LAB curves half way through the execution. After getting the LAB curves adjusted (as outlined in step 4 below), you'll be presented with a “Duplicate Layer” dialog — You MUST select your original document from the second drop down menu for things to work correctly. Give it a try, and let me know if there are any problems with it. Also, before you run it, you might want to run through the steps below just to get a better idea of what it's doing.
1. OPEN YOUR IMAGE IN RGB MODE
The RGB color mode is the most common to work with, so I'll assume that most of us use this as our default. We can still work in RGB even though we're doing adjustments in LAB color mode — it's just a little extra work. So open up your image as you normally would and apply any touch-ups such as spot removal or any other cloning or cropping. Once you're comfortable with the base image, we'll start looking at the color and contrast.
You can also go a different route than what I'm showing here — you could actually start up in LAB color mode straight out of the RAW file (for those of us processing RAW), skip steps 2 and 3, go straight to boosting the saturation, and just convert back to RGB when you're done. What you want to avoid is excessively switching back and forth between RGB and LAB color modes.
2. RGB CURVE ADJUSTMENTS
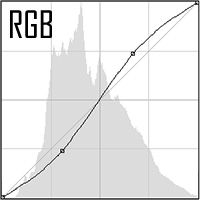
After applying my touch-ups, a curves adjustment is usually the first thing I do. The RGB curve is great for increasing contrast using the traditional “S” curve as I've shown here. This adjustment also gives the appearance of increased saturation too, so it's a good idea to apply it and dial in your contrast prior to adding any color saturation.
3. OPEN A COPY IN LAB MODE
Make a copy of the visible image by doing a “Stamp Visible” command (Ctrl+Alt+Shift+E). This gives us a single layer that contains all of the underlying adjustments we've applied. Now take this layer and duplicate it to a new document. Once in that new document, change the color mode to “LAB”. Why not just change the color mode in the original file? You'll lose any RGB-specific adjustment layers such as the curves adjustment we just applied (go ahead, try it and see what happens). OK, so now we're working with LAB and we're ready to boost the contrast.
4. LAB CURVE ADJUSTMENTS
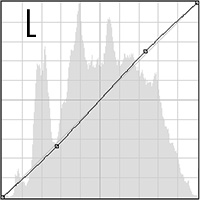
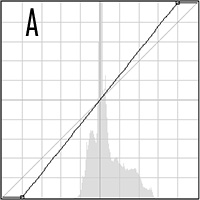
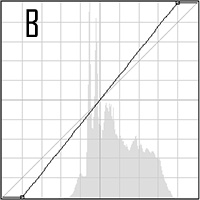
We'll do the saturation adjustment with a curves adjustment layer, but this time we'll be adjusting each channel individually. Start with the “A” and “B” channels and make the adjustments as shown in the screenshot. Be sure to pull each side of the curve in equal amounts, otherwise you'll end up with some funky color shifts. Same goes for adjustments between the two channels — try to keep them in the same ballpark. The last step is to go back to the “Lightness” channel and put a slight “S” curve into it to fine tune the contrast after adjusting the saturation. Again, extra contrast adds to the appearance of extra saturation.
5. COPY BACK TO THE RGB IMAGE
Once you're happy with your saturation adjustment, you can merge the layers, stamp visible, flatten, etc. to give you a single layer with all of the color information. Now copy that layer back to your original image — it should convert itself back into RGB when you copy it over.
Once you're back in the original image, you're pretty much done with the adjustment. You can now toy around with masking and opacity settings to get the final look you're after. If you're seeing localized spots that seem too saturated our out of place, you can just brush over them on the mask with a low opacity brush until you get the results you need.
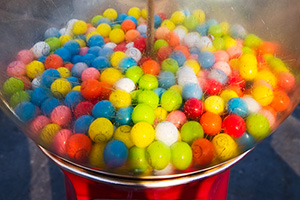
A COMPARISON OF THE RESULTS
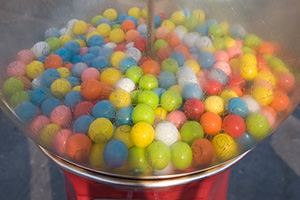
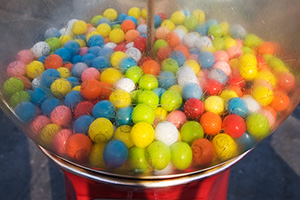
Now for the fun part — let's evaluate just how much better this technique is from a standard saturation adjustment that most of us are familiar with. Sometimes the old RGB method will work out better for you, but in my opinion, the LAB saturation is much more natural with deeper colors and less highlight clipping.
LAB Saturated (shown), RGB Saturated (mouse over)

LAB Saturated (shown), Curves Only (mouse over)
RGB Saturated (shown), Curves Only (mouse over)
LAB Saturated (shown), Original (mouse over)
RGB Saturated (shown), Original (mouse over)
My Camera World
December 20, 2007This is one of my favourite actions mainly when I have muted colour. The benefits with using LAB over RGB Sat is that in LAB, the curves causes the colours to separate more and therefore create more colour contrast. The A is the Red/Green and the B is the Yellow/Blue. You will sometimes get colours that do not always stay in the RGB or Adobe RIB space.
That is why for most of my images I like Photo Pro, a very large colour space. I keep the masters in this space as you never know when devices will be able to produce more of these colour spaces. As an example my Epson 2200 can produce colours outside the adobe RGB space which is larger than the standard RGB space.
Another benefit of LAB is that it is great to remove the blue haze in the distance from landscape scenes. Just tweak the Blue in the B channel.
For those whoa re interested in learning more I highly recommend the Photoshop LAB Color: The Canyon Conundrum and Other Adventures in the Most Powerful Colorspace by Dan Margulis
You will need to work through all the exercise to really appreeicate how LAB can solve many colour problems that RGB cannot.
Niels Henriksen
Joe
December 26, 2007Pretty elementary technique – hardly even worth reading.
Brian Auer
December 26, 2007Thank you for your fresh perspective! Perhaps you could direct us to the more advanced tutorial that you’ve written.
Rick Harris
December 28, 2007On the contrary — I found it very helpful. I have used LAB in the past, and am grateful you reminded me of its benefits. Great tutorial.
Valerie Davenport
December 31, 2007I had heard about adjusting LAB saturation before but it seemed so complicated that I dropped my investigation. I came here, downloaded the action, watched what happened in Photoshop, and now I feel like I have a better grasp on this concept. Thanks for the help!
Brian Auer
December 31, 2007I’m glad to hear somebody used the action I put together. The process really isn’t too bad, but it’s a lot of tedious little steps. Once I put the action together, I personally use this technique way more often than I did before.
ron greco
January 12, 2008In marulis three key strokes to change a color. How do you do this eithout changing the other colors in the image?
Michael Allen
January 11, 2009I love this Action set.
However I’ve run into a huge problem. Whenever it gets to the “Close” step, I think that the 3rd to last step, it closes out the image after I say “Don’t Save”. This leaves the last two steps worthless because there is no image for them to modify. Am I doing something wrong?
Brian Auer
January 11, 2009Right before the Close step, the action should be duplicating the layer back to the original document. You’ll see the dialog box and you’ll have to select your original document in the option. If you don’t do this step correctly, the rest of the action is screwed up.
John
February 9, 2009Hi there!
thank you very much indeed for the method, it´s great. But I´ve tryed to download de action but what happens is that loads of words without any sense apears in my screen. I guess it has to be with the fact that I run a Mac. Is the action compatible with Mac?
Thanks
Brian Auer
February 9, 2009It should be compatible with the Mac, but I think there’s a difference in the file extension or something. I’ve heard other people having issues with the actions, but I can’t recall how they got around it.
John
February 9, 2009Thanks Brian for the quick answer. But I can´t imagine another way to make it run. The other way is to replay it step by step on CS3, but I´m not sure I´ll get the same result. if you find any other way just let me know, please.
Take care
Brian Auer
February 9, 2009Check out this comment on another post of mine: https://epicedits.com/2008/12/23/flickr-resizer-photoshop-actions/#comment-110577
It looks like they saved it as “some-action.atn.txt” and deleted the “.txt”
Oumhani
August 29, 2009Awesome tut on a subject that’s not easy to grasp. Just tried the action on a portrait and it works great. Thanks a million.