Photoshop Techniques: Cross Process and Redscale
I gotta hand it to the film guys, they sure know how to have a good time. I'm fascinated by the many methods and techniques they can use to produce some very interesting images, all of which are only possible with film. As digital photographers, we can only try to mimic what they can do in hopes that our work will turn out half as interesting. Here are a couple of my favorite film photography techniques that can be (sort of) reproduced with Photoshop.

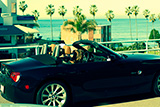
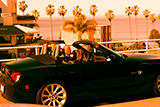
Cross processing is a film photography technique whereby the film is deliberately processed in a solution intended for a different type of film. The effect is usually heavy color shifts, increased contrast, over-saturation, and a funky greenish-yellow tint.

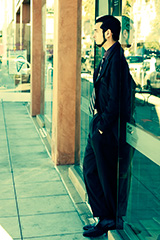
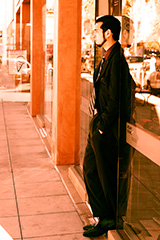
Redscale is another film photography technique whereby the film is loaded into the camera facing the wrong direction. This causes the red layer of the film to be exposed first, thus absorbing more light than it would normally. Blue now becomes the last layer to absorb light, so it's nearly non-existent. These images have a very distinct red color shift, but can range from yellow to maroon.
Here are some of my previous cross-processed photos.


Keep in mind that these techniques are highly subjective, so many cross processed and redscale images will have similar traits while being drastically different. I've put together a couple of Photoshop actions that will help start the process for these techniques. These have been added to the previous actions for LAB Sharpening and LAB Saturation.
DOWNLOAD THE PHOTOSHOP ACTIONS
These actions will lay down three layers to get you in the right direction, but think of them as more of a starting point than an ending point. Dig into it and start tweaking the layers until you find something that works for that image. Since the layers are non-destructive adjustment layers, you can edit one at a time, little by little, until you get the photo where you want it.
CROSS PROCESSING TECHNIQUE

This is a fairly simple process, it just takes a lot of time if you don't use the Photoshop Action provided. I picked this up at PhotoshopSupport.com, made a few tweaks, and wrapped it up in a Photoshop Action.
1. PROCESS THE COLOR CURVES
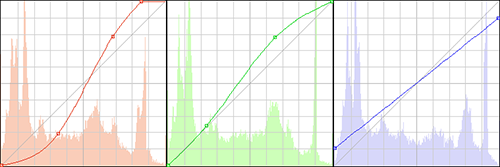
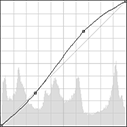
A curves adjustment layer (Layer >> New Adjustment Layer >> Curves…) is typically used on the composite channel to boost contrast. We'll be ignoring the composite channel and working on each of the color channels. As you get into the setup dialog box for the curves, be sure to set the blend mode to “Color” and leave it at 100% opacity for now. So here are what my curves look like in the red, green, and blue channels. This isn't an exact science, so don't worry if it's not perfect — you'll want to tweak on things differently for each image anyways.
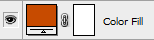
2. ADD THE COLOR CAST

Here, we're just adding a fill layer at a low opacity (Layer >> New Fill Layer >> Solid Color…). Again, in the setup dialog box for the fill layer, be sure to set the blend mode to “Color” and bring the opacity down to about 10 or 15%. Start off using the color “#E1FF00” and work from there — it's kind of a lime green/yellow. This will give us that green tint.
3. BOOST THE CONTRAST
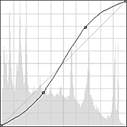
At this point, the image is probably looking pretty close, but a little dull and flat. We'll use another curves adjustment layer to boost the contrast. Be sure to set the blend mode to “Luminosity” and leave it at 100% — this will ensure that we keep our colors and our brightness separate. Throw in a nice “S” curve and adjust to your liking. Don't be afraid to blow out some highlights, since that's fairly common in cross processed photos.
4. (OPTIONAL) SATURATION BOOST
This isn't usually necessary, but if you want to give the color a little more punch, run my LAB Saturation action (included in the download set) and adjust the parameters until you're happy with it.
REDSCALE TECHNIQUE

I based this one off of the cross processing technique by altering the colors and curves. It may not be the best way to accomplish this, but it works fairly well and it gives you great control over your colors.
1. PROCESS THE COLOR CURVES
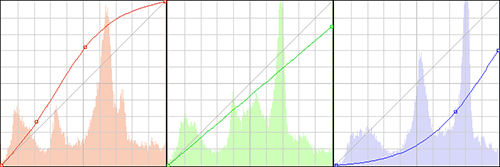
Again, we'll be ignoring the composite channel and working on each of the color channels. As you get into the setup dialog box for the curves, be sure to set the blend mode to “Color” and leave it at 100% opacity for now. So here are what my curves look like in the red, green, and blue channels. The main thing you need to know here is that the blue channel will give you the most control over the final color of the image. Drag the point in the middle of the curve up and to the left, and you'll get more of a magenta tone. Drag the point down and to the right, and you'll get more of an orange or yellow tone. These are all feasible outcomes of redscale film photography.
2. ADD THE COLOR CAST
Here, we're just adding a fill layer at a low opacity (Layer >> New Fill Layer >> Solid Color…). Again, in the setup dialog box for the fill layer, be sure to set the blend mode to “Color” and bring the opacity down to about 15 or 25%. Start off using the color “#CC4400” and work from there — it's kind of a brick red/orange. Most of the red will come from the previous layer, but this will add some. Here, you can also adjust how yellow or magenta the layer is along with the opacity.
3. BOOST THE CONTRAST
Redscales are typically less contrasty than cross processed photos, but this step will give you control over that and let you play around a little. We'll use another curves adjustment layer to boost the contrast, just like we did with cross processing — but this one I've set the shadows to be less dark. Be sure to set the blend mode to “Luminosity” and leave it at 100% — this will ensure that we keep our colors and our brightness separate. After you're done with this, you can continue to boost the saturation, sharpen the photo, etc.
So there are two techniques to mess around with. Use them sparingly, otherwise it'll start to lose it's magic with your onlookers. I've found that street scenes tend to work well with these techniques, but you'd actually be surprised at how many different images could benefit from a little artistic flare such as this.
If you use one of these techniques on some photos in the near future, leave a link in the comments below — I'd like to check them out!
Antoine Khater
February 15, 2008Sure i’m happy I’ve asked for that post 😀
Thank you for the actions can’t wait to test them
his4ever
February 15, 2008Wow this is very cool. There was a picture I took that I wanted this done too, but I did not know this was the way to go or what it was called! Thanks!
shimonkey
February 15, 2008Oh I love digital cross processing my photos, gives the greyer street stuff some edge.
Chica
February 15, 2008i’ve always done things the long way around, I don’t even know how to use an action! lol. i suppose I will teach myself now. 🙂
Brian Auer
February 15, 2008It’s such a time-saver Chica — I have a ton of actions set up for myself spanning things like processing techniques all the way down to saving an image for Flickr. Most of my actions are just little snip-its of a process… adding grain, adding vignette, high pass sharpening, blur effects, etc. Definitely give these actions a try, and if you find yourself liking some of them but constantly tweaking one or two of the steps, just re-record that step with your preferred settings. It’s all about customization and productivity.
Nick
February 15, 2008neat trick
the_wolf_brigade
February 16, 2008As always, brilliant tips – if only I had photoshop! lol
Anyway, just wanted to add a bit to the film side of things.
The greenish-yellow tint will actually depend on the film being cross-processed. I’ve done it with Ektachrome and achieved a green tint, but I’ve heard that Velvia results in a red tint – the process seems quite subjective.
Another feature of cross-processed stuff is deep, deep shadows. As you can see, this often results in loss of detail, particularly in the eyes. While this means that cross-processing stuff is not brilliant for close ups of people (the eyes go freaky black), it can be used at a distance with nice results.
Keeping all this in mind, I’m curious if similar results could be achieved with PS? Obviously the depth of the shadows couldn’t be as random as C41 processed slide film, but perhaps the contrast could be increased to a certain degree to give the effect of ‘blown’ shadow detail?
roentarre
February 17, 2008Thanks for this tutorial. Very helpful in deed. Love your blog
dawn
February 17, 2008Thanks for this tutorial. Very helpful in deed. Love your blog
shimonkey
February 18, 2008the_wolf_brigade, I do something similar in Lightroom by using the blacks slider, makes the shadows more inky if you know what I mean. Works pretty well I think but I have never cross-processed film so I’m just guessing from seeing other people’s film work. Here’s an example…
https://www.flickr.com/photos/shimonkey/2246208512/
the_wolf_brigade
February 18, 2008@shimonkey
Yes, those are very similar, though Xpro’d slide tends to “bleed” from the shadows a bit. I would assume this would be easy enough to replicate.
Brian, I forgot to mention that I’d never heard of loading the film backwards for that red effect. I’m definitely going to try this.
Voos
September 16, 2008Hey man! thanks for these photoshop actions! I will try them out!
ros
October 12, 2008i must really thank you for this cross processing tip! i tried it out and it looks great! love the green tint and how it gives a mood to the whole photo. thanks again! 🙂
Queda de Cabelo
October 24, 2008Hello Brian!
Thanks for this tutorial, I really like how the image tinting looks on the people photos. It looks like the photo was taken in the 70s, very nice and very stylish! I will try these tips out now! Thanks a lot!
the_wolf_brigade
December 4, 200810 months later I have finally loaded my first roll of redscale….next on the list is negative film processed as E6.
Brian Auer
December 4, 2008That’s awesome dude! I’m curious to see the results after you shoot it. Any idea if you have to compensate for the exposure when you shoot through the wrong side of the film? It seems like you would have to let more light in because you’re shooting through the film before you hit the emulsion — I’d think it acts like a filter.
Michael Allen
December 12, 2008Lovely action sets!
I’m curious though… whenever I use the cross-processing techniques you have here, my photos turn out extremely green and oversaturated. The examples that you have here (ie. the man on the bench) look much different than what I get. I’ve tried tweaking the RGB curves but nothing gives me the same washed out, clean and crisp images that you have shown.
Do you have an additional advice?
Brian Auer
December 12, 2008As mentioned, the actions are just starting points. Play around with the opacity of the color fill layer and toy with the contrast curve.
Keith
February 9, 2009Really amazing tips, I like the older look it gives to some and adds more style as well.
The greenish-yellow tint is my favorite.
James
May 20, 2009Thanks for the actions, I’ve been meaning to play around with fake cross processing for awhile and it looks like you just saved me a ton of time!
miya
April 30, 2010hi, your atn is so great! great help for me editing those images. Thanks so much! 😀