Your Guide to Adobe Bridge: File Processing

Last time we talked about preparing our files to be processed. So now it's finally time to start doing some photo editing! In this article, we'll be focusing on the first round of processing using Adobe Camera RAW software.
Be aware that I'm using my own RAW workflow as an example for our series of articles. There are some differences between RAW and JPEG, and I'll try to point them out along the way. The way that I intend to present this material should help close the gap between the two formats, but call me out if I miss something on the JPEG side of things.
FOLLOW THIS SERIES OF ARTICLES!
VISIT THE TABLE OF CONTENTS
BACK — ADOBE BRIDGE FILE PREPARATION
NEXT — ADOBE BRIDGE ORGANIZING
THE FORMAT WARS
In our last article, I mentioned I would be using a RAW workflow for this step. Processing RAW files is really a snap with Adobe Camera RAW (ACR), and it doesn't have to take a lot of extra time or effort.
Also in a recent article, I showed the difference between RAW and JPEG, unprocessed and processed with ACR. The purpose of this article was two fold: to show the difference between JPEG and RAW, and to introduce the notion of processing JPEG files with a RAW processor such as ACR. So regardless of which format you prefer, the following steps are still applicable. Do note though, that processing JPEG files with ACR is a new feature found in the CS3 bundle.
BULK PROCESSING

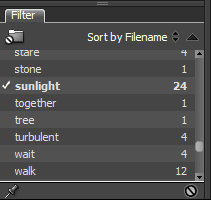
If you recall in our last installment of this series, I pointed out that I keyword my photos with lighting conditions. I also said that this would save us some time when it came to processing the files. Here's why.
Similar lighting conditions will result in similar white balance. By grouping photos according to the lighting condition, we can process each group more quickly by bulk processing the white balance settings.
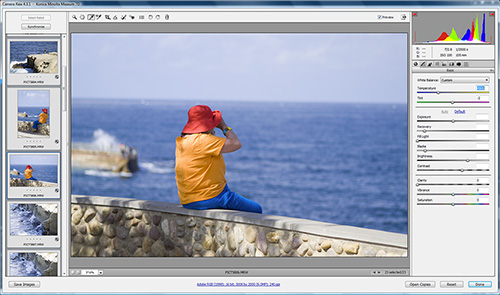
With that in mind, to begin the bulk processing I'll filter my photos by lighting condition, select everything that is similar, and open them in Adobe Camera RAW. This can be done with a right-click and choosing “Open in Camera Raw…” or via the menus (File >> Open in Camera Raw…) or by pressing Ctrl+R. This loads all the selected images into ACR, and you can see their thumbnails at the left of the screen.
SETTING THE WHITE BALANCE
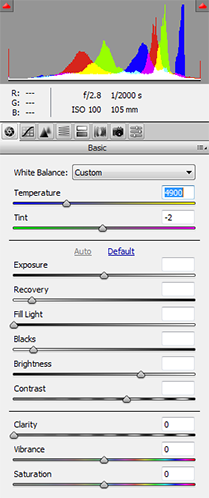
On the ACR basic adjustments panel, you can basically start at the top adjustments and work your way down. So white balance is one of the first things you want to establish. There are four basic ways to set white balance, but whatever method you choose, it would be wise to have a calibrated monitor.
At this point, if you're processing photos with very similar lighting conditions you can select all the images and apply the white balance and other settings to the whole batch. I won't go through each method of setting white balance in ACR (because this series is about Bridge), but here's an overview:
The first (and simplest) method for setting white balance is with the “Auto” setting. This tells ACR to do its best in determining the correct white balance for each photo on an individual basis. The second method for setting white balance is with one of the “Presets” (not available with JPEG) — daylight, cloudy, shade, tungsten, fluorescent, etc. These settings are usually close enough to use as a starting point, but I've noticed that they often need some tweaking to get them spot on. The third method for setting white balance is with a “Custom” setting on the adjustment sliders. Here, you can warm things up (yellow) or cool them down (blue), and add some green tint or magenta tint. With this method, a calibrated monitor is especially important. The final method for setting white balance is by sampling a part of the photo. To do this, use the “White Balance Tool” and select something that you know to be neutral gray. This is why studio photographers will shoot a “gray card” prior to photographing their subjects — it makes setting the white balance a no-brainer.

I typically start with a preset and adjust from there. Sometimes I'll use the sampling method, but I don't always have a good neutral source to work with. But whatever I happen to do, I always flip through the images in ACR to double check my bulk settings — there are always a few that need some further tweaks.
BASIC ADJUSTMENTS
OK, so the white balance is set and we're ready to move on. The next step is to adjust the exposure settings (the middle portion of the “Basic” palette). Here, you can adjust your exposure, recovery, fill light, blacks, brightness, and contrast. I won't get into what each of those adjustments does, but I encourage you to experiment with them.
Since I'm only doing a first round of processing on my images at this point, I don't spend a ton of time adjusting these values. The purpose of this step in the workflow is to get the white balance correct and to make the images look more “natural” rather than looking like the dull RAW files that come out of your camera.
So… I usually just select all the images I'm working with and hit the “Auto” button (and as with auto white balance, each image is set individually by ACR). This gets things to about 90% of where they need to be. Certainly, many of the photos could benefit from more detailed adjustments, but it's not worth the time and effort if a good portion of your photos will never be seen by anyone else.
Once again, I take a quick run-through of all the photos to make sure the software didn't make some terrible choices. Every once in a while it does, and I'll have to manually adjust the photo to bring it to a presentable state. But again, don't get carried away with this stuff — it's supposed to be quick.
OTHER ADJUSTMENTS
After applying the basic settings for white balance and exposure, you can jump into some other things — I typically don't, but you might want to depending on your camera and your photos.

You can apply bulk adjustments to your saturation, tone curves, and sharpness if you'd like. Also, if you use a lens that needs consistent corrections for fringing or vignette, you can bulk process your images to save a lot of time. Honestly though, beyond white balance and basic exposure settings, I don't mess with much. All I want at this point is to be able to view the photos in a more “natural” state so I can determine which photos will require more of my time.
When you're all done making bulk and individual adjustments in ACR, simply select all the photos and hit “Done”. This will apply those settings to the XMP metadata and Bridge will update the previews for those photos. So you're not actually making any changes to the photos, regardless of whether you're using JPEG or RAW. The best part is that the new adjustments are stored along with the original settings. If you open one of your images back up in ACR it will look exactly as you left it, but you can also revert back to “As Shot” by using the pull-down menu on the palette menubar and choosing “Camera RAW Defaults”.
AFTERTHOUGHTS
Let's say you either don't want to pull hundreds of images into ACR at once, or you simply forgot to include some photos. With Bridge, there's an easy way to apply those processing adjustments outside of Adobe Camera RAW. This method also works well if you just want to change white balance settings across multiple images.
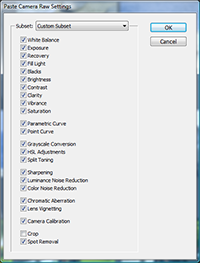
First, you need to select an image that you want to copy the settings from. Once you do that, you can copy those settings to memory by pressing Ctrl+Alt+C or by using the right-click menu or “Edit” menu and looking for the “Develop Settings” option. Now, select one or more images that you want to apply some or all of those adjustments to and press Crtl+Alt+V (or use the menus again) to paste the settings. This will bring up a dialog box that asks you which settings and adjustments you'd like to apply. Pick the ones you need and apply them — that's it!
Another thing this is useful for is spot removal. I won't get into it, but if you have a dirty sensor it's something you might look into to help you tame those dust bunnies.
WHAT'S NEXT?
After running through your various lighting groups, you should have a full set of processed photos. They won't be fully processed, but they should be in a better place than when you started. For some of you, this level of processing suits your needs just fine. For others, you'll want to really dig into things and give some special attention to certain aspects of the photo.
In the next article of this series, we'll go back to Bridge and take a look at how to efficiently keep track of your photos in their various stages of post-processing. If you're anything like me, you've got some photos that are waiting to be worked on, some that are being worked on, some that are complete, and some that you want to revisit. I'll show you how I use labels and collections to keep track of things.
FOLLOW THIS SERIES OF ARTICLES!
VISIT THE TABLE OF CONTENTS
BACK — ADOBE BRIDGE FILE PREPARATION
NEXT — ADOBE BRIDGE ORGANIZING
Here’s a video I found that goes well with the content discussed in this article.


Brian Auer
April 9, 2008Good point, and that’s something I’ll touch on in a later article in this series (because in this article, we’re just “developing” the raw files rather than fully processing the photos – no Photoshop needed).
If you’re bringing a lot of photos into Photoshop and saving the PSD files, just beware of your file size. Smart objects are neat, but they take up more space too. I’ll typically stay away from smart objects on the base layer — if I need to make adjustments to the original, I’ll just make those adjustments on the RAW and replace the layer in the PSD file.
libeco
April 9, 2008Just something I learned from Scott Kelby’s books: when you want to open your RAW file as a smart object in Photoshop (CS3 for sure, don’t know about older versions), hold the shift key and the open button will change into something like “open as smart object”.
Now you can copy the layer as a new smart object, double click that one and re-adjust (if for instance the sky’s highlights need some tweaking. Than just use a mask to create a simple image with multiple “exposures”.
Paul Alencikas
April 23, 2008Brian, I am the photo librarian for the Office of Publications at a large university. I think that Bridge CS3 is great for this kind of thing. I hope you continue with your series on Bridge as I don’t know it at all and am not a photographer. I want to make our digital library as easy as possible to control both for myself and for who follows me. Anyway, thanks for making your Bridge knowledge available to the masses.-Paul