Your Guide to Adobe Bridge: File Preparation

Last time we talked about importing photos through Adobe Bridge. Now that we have our photos transferred over with some basic metadata embedded, we can start preparing for processing, selection, and finalization.
In my workflow, file preparation consists of knocking out the duds, more metadata, basic keywording, and file renaming. Getting rid of non-usable photos helps to free up clutter and disk space. Extra metadata can include things like location and lighting. Basic keywording helps to initially separate and group photos. And file renaming adds information that's more visible to anybody handling your files. In total, these steps should take no more than 10 minutes of your time, even if you have several hundred files to work with.
FOLLOW THIS SERIES OF ARTICLES!
VISIT THE TABLE OF CONTENTS
BACK — ADOBE BRIDGE IMPORTING
NEXT — ADOBE BRIDGE FILE PROCESSING
TAKING THE TRASH OUT
Before anything else, I always take a quick run through the photos and delete anything that needs to be deleted. Why? Well, there's no sense in spending the extra time on those files working with metadata and processing — they're only going to get in the way. Not only that, they take up extra disk space and clutter the folder.
I'm not talking about deleting the “sort of bad” photos — those are fine to hang on to sometimes. The photos I delete are those either completely out of focus, exposure is WAY off, or maybe something that a person or object unexpectedly blocked a majority of the scene. I also delete duplicates. Sometimes I'll shoot in rapid-fire mode and I'll end up with several of the same photos. I'll shoot this way for several reasons: moving objects, low shutter speed, accidental, etc. If I have five photos of basically the same thing, I'll look at them in detail and keep the best 1 or 2 out of the bunch.
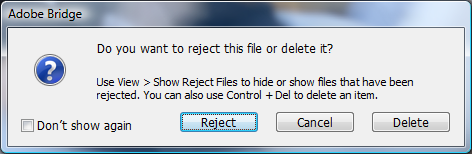
Adobe Bridge offers two methods of “deleting” photos. If you select a photo and press the “Delete” key, you'll probably see a dialog box similar to the one I've shown. By default, Bridge will “Reject” photos when you press the “Delete” key. This just removes the thumbnail from Bridge but leaves the file alone on the hard drive. To completely delete a photo, hold down the “Ctrl” key (Cmd for Mac) before pressing the “Delete” key.
APPLYING LOCATION METADATA
I typically group my photos by a particular photo shoot — so every photo in a given folder is from the same geographic location. Even though I include this information in my folder naming convention, that metadata is not yet contained in the photo.
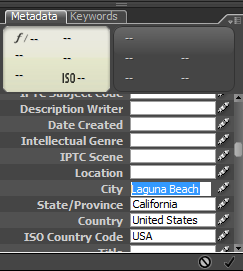
In the IPTC Metadata, there exist several fields for geographic location data. You can place the country, state/province, city, and location within a city. I generally fill in everything I can, sometimes leaving out “Location” and “City” depending on where I shot the photos.
Applying these values is a snap — just select all of your photos for a particular location, set the values in the Metadata panel, and click the apply button at the bottom. Do this step with every set of photos and you'll have a fairly quick method of locating images by location with a simple search or filter.
APPLYING BASIC KEYWORDS
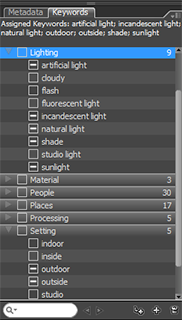
Aside from location metadata, I like to start on a few choice keywords prior to processing the files. I have a couple of keyword categories in my Keyword panel for lighting conditions. I apply these “lighting” keywords prior to processing because they help me separate similar files based on the approximate white balance. This will be important when we pull files into Adobe Camera RAW.
I tag photos for things like “natural light”, “artificial light”, “flash”, “studio”, “sunlight”, “shade”, “fluorescent light”, etc. These keywords give me a good idea of which photos can be processed in batches for white balance. This can be a huge time-saver if you have hundreds of photos shot with very similar lighting conditions.
At this point, you could do the rest of your keywording — it won't hurt anything. I like to get my files processed as quickly as possible so I can view them in a more natural state. But if you like to dig right in to the task of keywording, nobody's stopping you.
BATCH RENAMING WITH BRIDGE
In the past I was never big on renaming my files — I just didn't see any need for it. Neil changed my mind with his series on photo organization. I like the naming convention he presented (NAME-YYMMDD-XXXX) and it helps me identify my photos with more ease.
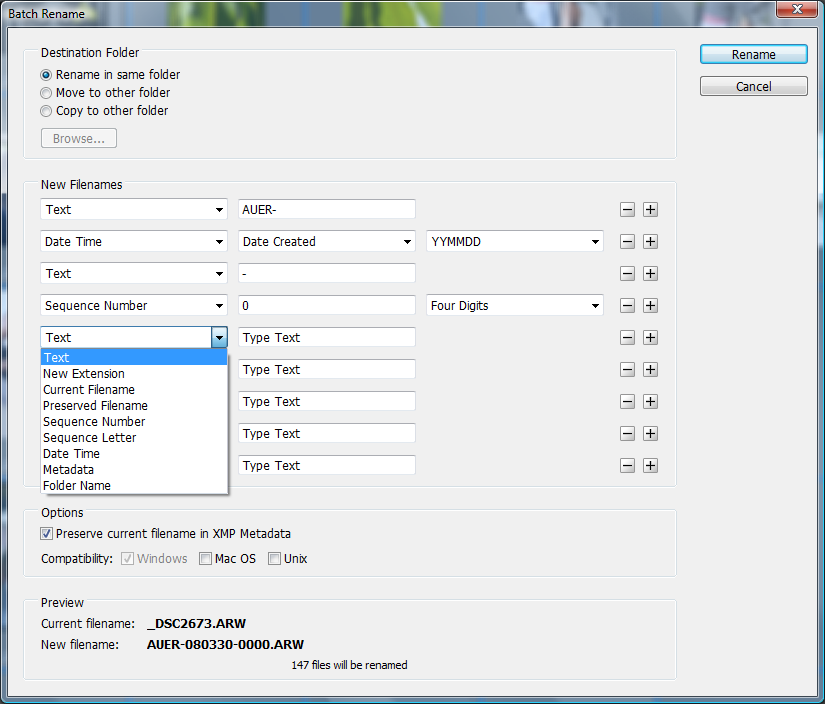
Adobe Bridge offers the ability to batch rename your photos with a powerful interface. After selecting the files you wish to rename and entering the “Batch Rename” dialog via the right-click menu or in your “Tools” menu. The dialog gives you the option of where the new files will placed, how to rename them, previous filename preservation, OS compatibility, and it shows a nice preview of what the new names will look like.
There are nine different rule-types that can be applied in sequence with each other and combined to create a single filename. As you can see by my example, I use “Text” (AUER-) + “Date Time” (YYMMDD) + “Text” (-) + “Sequence” (XXXX) to create the naming structure that I want. You should be able to get whatever filename you need based on combinations of these nine rules, and you can even include several pieces of metadata if you so choose.
To add more naming rules, click the plus sign on an existing rule and add a line below it. To remove rules, click on the minus sign.
WHAT'S NEXT?
In the next part of this series I'll FINALLY get around to processing my images. For that step I'll be showing a RAW workflow and comparing it with a JPEG workflow. Fortunately for CS3 users, the two are very much the same. And for those who aren't convinced that RAW is king, I'll show some examples of the differences between working with RAW files and JPEG files.
FOLLOW THIS SERIES OF ARTICLES!
VISIT THE TABLE OF CONTENTS
BACK — ADOBE BRIDGE IMPORTING
NEXT — ADOBE BRIDGE FILE PROCESSING
Here’s a video I found that goes well with the content discussed in this article.
gail fitzgerald
June 11, 2008I batch renamed all of my raw files. When I then tried to burn them to a disc, it wouldn’t do it. I have already deleted the raw files from my computer (but thankfully not from my cards). What is going on?
Brian Auer
June 11, 2008Not sure why it wouldn’t burn them to a disc… the renaming shouldn’t have anything to do with that. And you WHAT?! You deleted your raw files? Why? I’m not totally clear on what’s happening and what you’re trying to do.
Mark penny
May 28, 2009Hi i have started adding keywords to my photos ie names of people. When i view a photo on another pc the keywords are missing? This worries me as sometimes i format my pc and re install everything to keep it running smooth again. But im worried when i put my photos back on the drive i would of lost the meta so wont be able to search for individual photos ? Regards mark.
Heather B
March 12, 2010Hi, I seem to be having some troubles with Bridge and cannot find any answers using the help line.
I am successful at adding metadata onto the picture in Bridge, however when I try to view the same picture in an MS window (ex. right click, properties, summary=no metadata) there is no data attached to that picture.
Does anyone know why this happens?Is there a solution?
Any help would appreciated!!
Brian Auer
March 12, 2010It depends on where the metadata is being stored. JPEG and TIFF files will usually keep the information embedded in the image file unless you tell Bridge to do otherwise (though I’m not even sure if that’s an option). RAW files utilize sidecar files to store metadata and post-processing information. If you export your images from ACR as JPEG or TIFF, those files will contain the metadata.