Watching and Waiting
I kind of gave away a sneak peak at my own final results from the photo used in the “Edit My Photo” project in yesterday's article on Using Photoshop to Add Vignette. So I figured I might as well post the real deal.
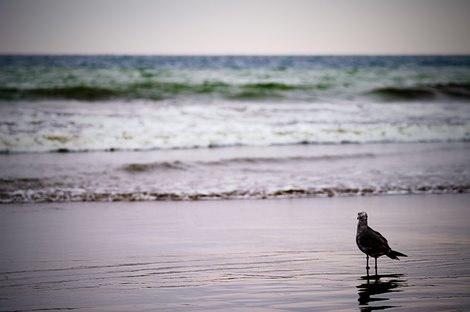
This photo was taken on the beach while I was at Trevor Carpenter's photowalk in Santa Monica. It was approaching evening and we all headed down to the beach for some more photo-ops. I kind of wandered off down the beach on my own with my macro lens attached. I took a few shots of some birds on the beach, but I wasn't too impressed with what I was getting at the time. I was a little disappointed that the yellow buoys were sticking out in the background, but I took the shots anyway. When I got back and saw this photo, it sparked my interest. I then realized that the buoys could easily be taken care of, and I was glad I took the shot. Lesson of the day: don't let little imperfections in the scene prevent you from getting the shot.
![]()
The JPEG (1) looks pretty dull, and gives the impression of slight underexposure (but it's actually exposed fine). I adjusted the RAW (2) file to brighten it up a little bit, add some contrast, and increase the color saturation. I also used the straighten tool to level the horizon and crop. The first thing I did inside Photoshop was some Touch-Up Work (3) to clone out the buoys and some dust spots. Then I duplicated the resulting image into a new layer and applied a Hard Mix Layer Blend (4) at 30% opacity and 30% fill to help out with the color and contrast. I still wasn't impressed with the contrast, so I applied a Levels Adjustment Layer (5) with a black point of 49 and a white point of 245. Taking the contrast to another stage, I used a Curves Adjustment Layer (6) to bring the lower mid-tones darker while keeping the upper mid-tones near their original value. For the levels and curves adjustment layers, I applied a mask over the bird to keep the small amount of detail to be found in the feathers — without the mask, the bird becomes a silhouette. Liking the contrast at this point, I looked toward the color saturation as a possible improvement. I didn't want it terribly saturated, but I wanted the colors to look a little cleaner. I increased the saturation using a Hue/Saturation Layer Adjustment (7) with +12 on the saturation — not a huge difference, but noticeable at larger scales. Then I made a copy layer of the resulting image and sharpened using the Unsharp Mask (8) at 120%, 5.4 pixels, and a threshold of 2. I didn't like how it made the entire image look, so I masked out the water and sky, leaving the beach. I also lightly masked the edges of the bird because the sharpening gave it a halo. The last thing I did to this image was the addition of Vignette (9) using the method outlined in yesterday's article with an amount of -55 and a midpoint of 20.
All of this took maybe 1.5 hours to complete (which includes going back and re-adjusting previous layers), but what I didn't tell you about was the other 2 or 3 hours of messing with it and trying things out over the course of two weeks. So I'd consider this a 4 hour photo.
** You can also see this photo at Zooomr and Flickr **
Photo by Brian Auer
08/04/07 Santa Monica, CA
Watching and Waiting
Konica Minolta Maxxum 7D
Sigma MACRO 105mm f/2.8 EX DG
158mm equiv * f/2.8 * 1/125s * ISO100
Robert Hammar
September 20, 2007Brian!
It looks great. How can it take you 1,5 hour to edit the photo? Most of the work what you have described can be done in Adobe Camera Raw 4.0 within 5-10 minutes.
If you have sensor dust and are cloning in Camera Raw, save then the settings for next picture!
All my best!
Robert
Brian Auer
September 20, 2007I tend not to do a lot of editing in ACR because it prevents me from going back and adjusting. I might lay down a couple layers, go back to the first one, tweak it, go back to the third one, tweak it, touch up the mask on the first one again, etc. A lot of the 1.5 hours includes just “getting there” with the adjustments. Of course, if I knew exactly which settings I were applying and in what order, I could have this whipped out in 5 minutes. Also, I don’t clone in ACR because 1) I might need to adjust it later (I use a non-destructive layer), and 2) my dust spots are constantly on the move since I blow out the chamber with each lens change. That’s a good point though — ACR has the capability to “remember” where your dust spots are.
Rygood
September 20, 2007I’m tellin ya, its all about the Lightroom!
Not only is it completely non-destructive, its integration with photoshop is pretty tight if you need to do layered adjustments.
Being that I work in Photoshop for a good portion of every day at work, I’m a big fan, but when i started using lightroom, as soon as I got the hang of it I was hooked.
I now use it almost exclusively for all of my retouching. Have you tried it?
Brian Auer
September 20, 2007Never tried it — I’ve always been a Photoshop user. Does it have the ability to organize photos too? I feel like I need something a little more sophisticated for my non-family photos.
susheel
September 21, 2007Brian,
Do try using lightroom, you’ll never look back. It has pretty good databasing and sorting capability… If you’ve used Adobe Bridge, you’ll understand the benefits of using star rankings and colour coding… Having said that, you may want to start off with cheaper (but not necessarily less powerful) RAW workflow software… try Bibble for starters.
At a more advanced stage, I recommend Capture One Pro and Apple Aperture…
Rygood
September 21, 2007I use lightroom exclusively as my organizing tool in my workflow. It is folder based, so organizing photos into albums based on tagging or another method isn’t going to work too well. If you do do a lot of family/personal type stuff I’d suggest using something different for those shots (picassa is great, as is iphoto) For me, I separate my family/friends stuff generally and use lightroom for my strictly photography obsession stuff.
On the same topic, lightroom rocks for creating quick web slideshows/gallerys with flash or html based on specific selections from your library.
Download the 30-day trial, try it, and feel free to hit me up with any questions. Its rare that I find a piece of software that i can stand behind so strongly, but lightroom has some kind of magic that not only speeds up my workflow dramatically, but also puts the tools i really need and use right in front of me, simplifying my entire process.
Wow, i sound like such a fanboy, but the quality is there… For gods sake, most of my photo friends who are big mac people got into Aperture early but have switched at this point.
Brian Auer
September 21, 2007I use Bridge occasionally, but the key thing it’s missing for me is the ability to group photos into sets or albums without actually moving the photos — unless I’m missing something. I’ll check into Bibble. I’ve been using Picasa, but it’s just not quite there on some features. It’s great with keywords and albums, but no multi-level star system or color coding.
Brian Auer
September 21, 2007I’m at the point now where I need to separate my personal and public stuff too. I’m in the process of setting up my new computer, so it’s a perfect opportunity to go through my files. I’ll definitely keep using Picasa for the family stuff, but I’m still unsure about my other stuff.
The 30 day trial sounds like a good way to go, I’ll have to do that once I get the computer in a stable configuration. I still need to install most of my software I had on my other computer, buy hey — I’ve got Photoshop and Firefox!
libeco
September 21, 2007I must say I always plan on really using bridge for sorting with keywords, color coding en star-ratings, but I never do much more than give the best photo’s in a folder a 5 star rating…
You say about the USM: …at 120%, 5.4 pixels, and a threshold of 2…
I must say I never go higher than 2,5, maybe 2,7 pixels at my 3888×2592 Canon 400D pictures or I’ll get huge halo’s. Using 5,4 seems kind of much to me, do you normally use such high numbers? Also I always leave the threshold at 0, I find it useless, I’d rather take the percentage down a bit…
Brian Auer
September 21, 2007About the sharpening, you’re right that 5.4 is high, but I masked out much of it. Like I said, the bird had a halo and I had to mask it off. I went with 5.4 because it gave the look I wanted on the beach.
SIDE NOTE: I can’t get any email through to you for the project — can you contact me with a different address?