Blown
So I finally inspired myself to process this photo of the crow. After my article on exposure and after looking through gobs of underexposed and overexposed photos on Flickr, it put me in the mood for doing some blown out highlights. The article also inspired me to start up a group project called “Blown Away“, which asks readers to post an overexposed photo they've taken. So here's one of my entries for the project.
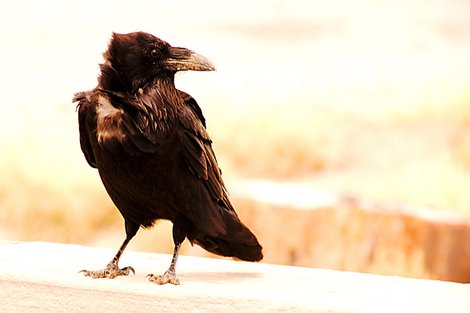
This photo was taken at the Petrified Forest, and it was really just an accident. I was going for the bird, but I wasn't really going for overexposure of the background — my camera just happened to meter that way. So because of that, it's the only shot I took with these exposure settings. I'm a little disappointed that I centered the bird in my rush to get a shot before it flew away, so I ended up cropping the image for better composition.

The JPEG (1) was seriously blown out, but that's what we're going for here. When I did the RAW processing (2) in ACR, I could have actually saved much of the highlights due to the fact that RAW images tend to have a slightly larger dynamic range than camera-processed JPEGs. But I left the highlights blown out, and I actually warmed up the photo a bit to add a little mood to it — I wanted it to have that warm yellowish-brown look. The first thing I did in CS3 was a color burn layer blend (3) at 50% opacity and 50% fill. This made the photo look a bit more harsh with sharper contrasts and more saturated colors. I then applied a curves adjustment layer (4) to bring the highlights and midtones back up a notch because the blend was a little much in certain areas. The last step was sharpening via the Unsharp Mask (5) at 183%, 3.7 pixels, and a threshold of 2. The sharpening was more extreme than I would usually do, but I liked the look it gave it.
** You can also see this photo on Flickr **
Photo by Brian Auer
07/13/07 Petrified Forest, AZ
Blown
Konica Minolta Maxxum 7D
Konica Minolta AF DT 18-200
300mm equiv * f/6.7 * 1/90s * ISO100
Andrew Ferguson
August 22, 2007You’re supposed to set the bar low so the rest of us don’t feel intimidated, geez 😛
Brian Auer
August 22, 2007Wait until you see some of the other submissions — they’re super cool. The great thing about these types of photos is that they have a highly artistic feel to them. I can’t wait to share all the entries with everybody!