Equipment Options for Macro Photography
I've been getting into macro photography more and more lately — partly because of Michael Brown — and I've found that there are a number of ways to obtain macro images, some of which are fairly inexpensive. Really, all you need to start with is either a camera with interchangeable lenses or any other type of camera that allows the attachment of filters — such as many of the ultra-zoom models. If you have at least that, there are several methods of getting macro photos out of your camera. Beware, though, once you start getting into macro photography, you'll likely get hooked on it.

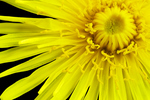
So what is macro photography? Many consumer level cameras have a “macro” mode on them, and many SLR lenses claim to be macro. But what is it really? Macro refers to close-up photography. In a strict sense, macro means that the subject being photographed is projected onto the image sensor at a lifesize scale, or 1:1 (one to one) magnification. So those cameras and lenses that say macro, but do not produce 1:1 images, are usually refering to their ability to focus on things closer than normal. In fact, many of the SLR zoom lenses that say macro on them are only capable of producing images at 1:2 magification, or half-lifesize.

What can you do to get 1:1 (or better) images? There are a multitide of options for going macro, and each of them has their own ups and downs. Not only do you have several options, but you have the capability to combine various pieces of equipment for different effects and magnifications. Use the right combinations and you can actually achieve greater than 1:1 magnification, such as 2:1, 4:1, 6:1, etc. Most of the options shown below are aimed at SLR or other removable lens camera systems, but there are also options for compact and ultra-zoom cameras.
THE DEDICATED MACRO LENS
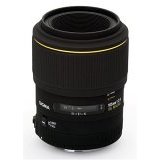
A dedicated macro lens is by far the best option for producing 1:1 macro images, but these are only available for camera systems with interchangeable lenses. A macro lens has a fixed focal length and can produce 1:1 images in addition to focusing out to infinity. This means that you can take super close-up photos of a flower or bug, then refocus and take a landscape or portrait photo without having to switch lenses or remove special macro equipment. These lenses are typically very sharp and fast (large maximum aperture), but a little expensive compared to the other macro options. They come in a variety of focal lengths, but they all have the same magnification capability. The difference is in standoff distance — with higher focal lengths giving you a greater working distance from your subjects. I have a 105mm f/2.8 macro from Sigma, which gives me a 12″ standoff height at 1:1, and it cost about $350.
EXTENSION TUBES AND BELLOWS
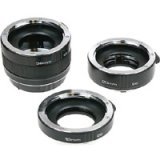
Extension tubes (also only available for interchangeable lens cameras) are a cheap method of decreasing the minimum focusing distance of a lens. This means that you can get closer to your subject, thus giving you more magnification. The longer the extension tube, the closer you can focus. The downside to using one or more of these tubes is that you lose the ability to focus out to infinity. The light intensity reaching the sensor also decreases as the lens is moved away, so you'll end up with a slower lens. The upside to them is that they're simple, contain no glass, relatively cheap, and stackable. They typically come in sets of 12mm, 20mm, and 36mm, but you can also find them as single tubes in various lengths. A bellows is simply an adjustable extension tube that costs a lot more. These tubes can also be added to a dedicated macro lens, increasing it's magnification past 1:1. I have a 25mm extension tube from Kenko, which gives my macro lens a magnification of about 1.25:1 and costs about $60.
REVERSING RINGS
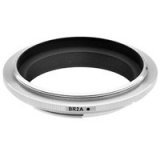
A reversing ring is similar to a step-up or step-down ring, but it has male filter threads on both sides. This allows you to attach one lens in reverse to another lens. So what does this do for you? It allows you to focus closer to the subject while also magnifying it by some amount (which depends on the focal length of the reversed lens). The most common setup with reversing rings include a 50mm f/1.4 or f/1.2 prime lens attached in reverse to either a 100mm dedicated macro lens or a standard telephoto over 200mm in focal length. The reversed lens needs to have a large maximum aperture and the other lens must have a long focal length so vignetting doesn't occur. This setup can be done with fairly little money if you opt for an older prime lens intended for manual cameras. It works best with an SLR system, but I wouldn't doubt that you can do it with an ultra-zoom camera that allows threaded filter attachments. I have a 50mm f/1.4 prime lens that I can use with two of my other lenses, and it cost me $40 on eBay.
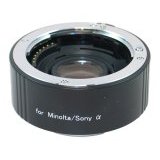
TELECONVERTERS
A teleconverter is an extra lens that is typically placed between the camera body and another lens on an SLR system. I think there are teleconverters for non-SLR systems that attach to the front of the lens, but I don't know how well they work. The teleconverter just adds extra magnification to the existing lens. Used alone, and depending on the lens you use it with, you may be able to get greater magnification of the subject at close focusing distances and allow you to get closer to “macro” shots. The real benefit to these is that they can be used with other macro equipment such as reversing rings and close-up filters. I don't have any of these yet.
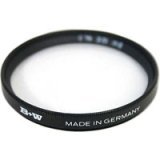
CLOSE-UP LENSES
A close-up lens, or close-up filter, is basically a magnifying glass that attaches to the front of your camera lens. It allows you to focus at closer distances than usual, thus creating more magnification. The upside to these is that they are small, lightweight, and easy to remove from the lens by unscrewing them from the filter threads. The downside is that they add another piece of glass (usually of lower quality than in your camera lens) between your subject and your sensor, possibly affecting the overall quality of the image. I don't have any of these either.
COMBINATIONS
When it comes to macro gear, you're not limited to one or the other — you can stack for added magnification! For example, I will typically add an extension tube to my macro lens to get a little closer. Then I can screw on the 50mm lens in reverse and get really close. This same setup also works with my 200mm non-macro lens for even more magnification. You can also add in more extension tubes, teleconverters, and close-up lenses. The things to watch out for when adding equipment together are vignetting and loss of image quality. In the animation above, here are the equipment setups shown:
- 105mm Macro Lens
- 25mm Extension Tube, 105mm Macro Lens
- 105mm Macro Lens, 50mm Reversed Lens
- 25mm Extension Tube, 105mm Macro Lens, 50mm Reversed Lens
- 25mm Extension Tube, 200mm Telephoto Lens
- 200mm Telephoto Lens, 50mm Reversed Lens
- 25mm Extension Tube, 200mm Telephoto Lens, 50mm Reversed Lens
So there you go, the basic optical equipment for macro photography. If you're interested in getting into macro, it doesn't have to be expensive and you don't have to do it all at once. Start gathering up the different pieces, and experiment with combos as you go.
Also check out my follow-up post that talks about more macro photography equipment — including things like tripods, sliders, ring flashes, reflectors, and more.
wingerz
May 30, 2007Great summary of options. I have been tempted by several of the pieces of equipment above.
One other thing that may come in handy (from what I’ve read) is a tripod. One that is capable of setting up low to the ground is great for small plants, and some tripods allow the camera to be pointed in all sorts of directions independent of the way the head moves.
Thalia
May 30, 2007Great summary of options. I have been tempted by several of the pieces of equipment above.
One other thing that may come in handy (from what I’ve read) is a tripod. One that is capable of setting up low to the ground is great for small plants, and some tripods allow the camera to be pointed in all sorts of directions independent of the way the head moves.
Brian Auer
May 30, 2007Cool! I’m glad you found this informative. I tried to get all the major items in the list, but I’m sure there are a few other obscure options out there. Save up for that macro lens — the 105 is a lot of fun to shoot with. Since I got mine, I’ve probably had it on the camera 80% of the time. I even prefer it to my 18-200 zoom. It’s such a blast!
Brian Auer
May 30, 2007Give in to your temptations — it’s totally worth it. You’re absolutely right about the tripod, too. I recently bought a nice tripod and ballhead that would allow me to get close to the ground. I didn’t mention any of the other pieces of equipment for macro photography because I didn’t want the list to be too big. I might write a follow-up post that talks about this other equipment…
Franxbudi
May 30, 2007Very good tips for photografy to follow your tips and learn more about this
Photographyvoter.com
May 30, 2007Brian,
Another excellent article. Great Stuff
Christopher Scholl
May 31, 2007Great list. Very well done.
Brian Auer
May 31, 2007Thanks guys, I appreciate it.
Michael Brown
June 2, 2007I heard about that Michael Brown, … and heard that he is one handsome dude!!! 🙂
This is a excellent piece Brian, and will add a link to it sometime later today, … tonight.
Another useful tool that you can use in macro, is a beanbag.
Put it on the ground, and have some fun.
Then you also have your macro sliders, (a must for me sometimes), angle finder, (to keep from killing your back & neck), small reflectors, etc.
Another thing that is “rarely mentioned” in macro, and something I almost always will use when going after a certain type of image with lots of details.
A “shutter release” or “cable release” to help minimize camera movement/shake.
And don’t forget “Advil”! LoL!
Take it easy buddy,
Mike
Denear
June 4, 2007Hi Brian,
If one does not have “stackable” lenses, would an adapter directly on your DsLR for mounting say a 50mm lens on backwards work? I do not know what this is called, but I saw a picture od a home made one on a forum post. What would this be called, as this would be a great start I would think.
Thanks for a great article.
Brian Auer
June 4, 2007@Mike – Handsome dude… LOL! Thanks for pointing out the other macro equipment. I’m thinking of writing up another article that focuses on the non-glass related equipment, such as the beanbags, tripods, sliders, cables, ring flash, reflectors, etc. Oh yes, and the Advil. This macro stuff really messes with your eyes when you spend too much time straining through the viewfinder.
@Denear – I think you’re talking about a reversing ring that mounts directly to the camera, right? I know I’ve seen them around (you might check eBay or something), but I don’t know the technical name for them. I’ve heard that you can mount a 50mm lens backward directly to the camera, but I don’t know what the results look like or what kind of magnification you’ll get. Like I said, eBay might be a good starting point — maybe search for “reversing ring” plus whatever camera model you have. It might pull up some reversing rings with a specific camera mount on one side.
Andrew Ferguson
June 6, 2007Macro photography is so beautiful. Unforuntately, if I look at them too long, I tend to think they’re all alike.
It’s a really popular but specialized field of photography. It also requires a budget that I don’t have yet.
For macro purposes (or in general) do you feel it’s worth the extra bucks to buy the IR remote vs. the cable release? I mean, sure it’s wireless but you can usually only trigger it from the front then. It’s a bit hard for wide angle shots, I bet.
Sorry for the mass amounts of comments; I’ve had no internet for a week while I moved apartments and I’m just reading 100+ blog entries on photography from my RSS Reader.
Brian Auer
June 6, 2007The budget thing isn’t too bad, but it can get pretty spendy when you start wanting the heavy duty equipment. I’ve easily got about another $1K in macro gear that I’d like to get my hands on.
I don’t know about the IR remote vs the shutter cable. I don’t have either of them — I typically use my 2 second delay if I’m working on the tripod.
The Dino
July 9, 2007Cost some money but it is possible to do good macro with less budget?
Travis Northcutt
July 18, 2007Brian, here’s the post I made with the links to your articles:
https://macrophotoblog.blogspot.com/2007/07/equipment-for-macro-photography.html
Thanks again.
Alan Cook
January 28, 2008Great article for macro photography! Unfortunately, my budget limits this to only a good read.
Jewell BunchIII
February 14, 2008hello there I have just seen your review on macro lens I have one quick question i am searching for a good macro lens for shooting a huge variety of macro shots from flowers to insects i want to be able to shoot everything in a good macro lens what is a good macro lens to go with I have done alot of research and everythng I have readied says that nikon 105mm lens,nikon 60mm lens,Tamron 90mm lens,and tamron 180mm lens are the best macro lens to buy to shoot great macro photography is this true