Photoshop Technique: Digital Airbrush
Airbrushing is (or was) a process typically used to remove minor imperfections in portrait, model, and fashion photography (among other uses in photography). I'll be presenting a digital airbrush technique in Photoshop intended to slightly smooth out skin textures in close up portraits. Sharp lenses and good lighting can produce very detailed captures, including all the small wrinkles and pores. Sometimes you just want to smooth out all those little things.
I've also created a Photoshop action to speed up the process described below. All you have to do is open up the original image and run it. The action stops at the filter dialogs and allows you to adjust them before proceeding. At the end of the action, you're all set up and ready to start airbrushing.
DOWNLOAD THE DIGITAL AIRBRUSH PHOTOSHOP ACTION
I should also mention that I learned this technique from at least one or two other sites out there (can't find the source for the life of me right now). I'm definitely not the originator — I'm just passing along my own interpretation of the process.
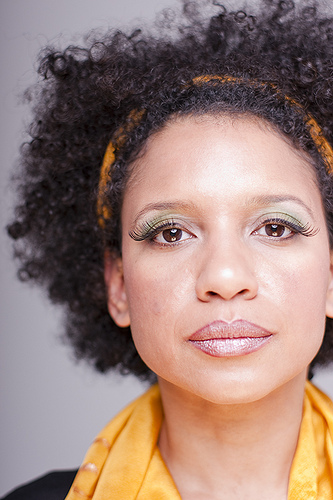
So here's the image I'll be working with… a very close-up and well-lit portrait. What you see immediately below is the final image after applying this airbrush technique. I'd show you the before image, but you wouldn't be able to see much of a difference at this size.
A couple of things to remember before I get into it: don't go overboard with the processing, experiment with the numbers to suit your image, and what I'm showing here is not the only way to do it. So let's get started.
1. ORIGINAL IMAGE

This is a crop of the original image after being processed in ACR for exposure, contrast, white balance, etc. The crop is a 50% zoom so we can see more of the image while retaining some of the important details. Take note of the small skin wrinkles and pores — these are the things we're going to smooth out a bit.
2. DUPLICATE BACKGROUND

When you open it up into Photoshop, duplicate the background layer. We need to do this because we're going to apply some destructive modifications to the top layer, and we'll be applying a layer mask later on. Essentially, we're going to make a “new skin” that can be airbrushed over the existing image.
3. SMOOTH IT OUT

Now it's time to make that skin into plastic. Apply the “Dust & Scratches” filter (Filter >> Noise >> Dust & Scratches…). Start with a 5px radius and adjust until you get something almost cartoon-looking. You want to get rid of the small details while maintaining the bigger details.
4. ADD BLUR

After smoothing out the little things, we want to add some blur to soften up the bigger things. Apply a “Gaussian Blur” filter (Filter >> Blur >> Gaussian Blur…). Again, start with a 5px radius and adjust until you lose that cartoon look. You want to soften the hard edges while maintaining some amount of contrast in the larger details.
5. ADD NOISE

This one is nearly impossible to see even at a 50% zoom — it's very subtle. Apply a small amount of the “Noise” filter (Filter >> Noise >> Add Noise…). Start around 0.7px with a uniform monochromatic noise and adjust until you can barely see it at 100% zoom. You want to break up the plastic look just a tiny bit with some texture.
6. MASK IT

Now that you've completely destroyed the working layer, mask it all out. Add a layer mask and fill it in black (Layer >> Layer Mask >> Hide All). Now your image should look like the original because we've masked out the modified layer.
7. AIRBRUSH TIME!

Grab your brush tool, soften up the edges, set the color to white, put the opacity to around 10 or 20%, and select the layer mask we just created. Adjust your brush size to suit your needs and start painting in some of the fake skin. The key here is to do a little bit at a time while varying your brush size and edge hardness. Paint over the areas where you want to remove small details. You want to brush in a little more fake skin than you need — we'll fix it in just a second.

The image above shows the mask applied to the image. You can see that we've removed most of the skin texture while keeping the details in the eye.

The image above shows the mask for the entire image. You can see that I focused mostly on the areas… in focus. I also made it a point to avoid the eyes, mouth, and hair. We don't want to soften up these areas.
8. BACK TO REALITY

At this point, you probably have something slightly resembling a plastic doll. No biggie — we can fix it. Simply adjust the opacity of the modified layer until you bring back some of the original skin texture. I ended up with an opacity of 70%, but you'll need to judge and adjust your own image based on how heavy you modified the skin during the airbrushing.
9. BEFORE & AFTER
As you can see from this split image, the final adjustment is not very harsh. The intent was to smooth out the very small wrinkles and skin pores visible in on the face.

And for those of you viewing this on the site, you can mouse over the image below to see an after and before effect. RSS and email readers will need to visit the site to see it (there's a JavaScript mouseover making it all happen).

I don't use this technique very often, but it's a good one to know. Useful for close up portraits, but that's about it. And don't abuse it — soft and subtle is the key here. A bit of skin texture is actually a good thing!