Nonlinear Curve Adjustments and Histograms
The last article on curves looked at linear adjustments and how those adjustments affect the image and the histogram. So now we'll take a look at some nonlinear adjustments within the curves adjustment tool found in many photo editing software packages.
We're basically building on our basic understanding of the histogram and our knowledge of linear curve adjustments to take the next step into nonlinear adjustments (the curvy curves).
NONLINEAR MANIPULATIONS
What I'm going to show here are some very basic curves at each extreme. The single bend and double bend curves are most commonly used during post-processing, but these are not the only options. Curves can have a large number of set points, bends, and inflections — it's just not feasible to cover every possibility in an article like this.
SINGLE BEND CURVES
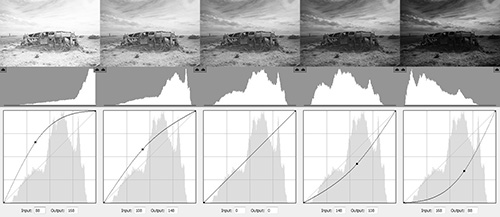
The simplest form of a nonlinear curve is accomplished by moving a mid-tone location toward the upper left or lower right corner, forming a basic arc with a single bend. Essentially, your black and white points remain fixed while your mid-tones become lighter or darker (aka: brightness). Also note that one end of your tones will take on more contrast while the other end will lose contrast due to the change in slope of the curve (remember: vertical = high contrast, horizontal = low contrast).
This can be used to brighten or darken the overall image if you want to maintain your highlights and shadows at their current values.
DOUBLE BEND CURVES
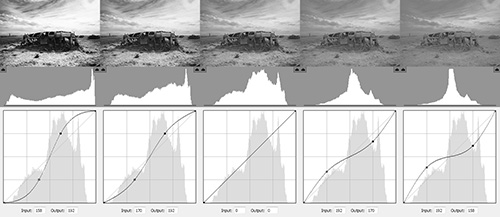
Also known as the “S-Curve”, this curve manipulation pushes one section of tones brighter and another section of tones darker (aka: contrast). Again, you can maintain your black and white points, but you also maintain some middle tone where the curve crosses the diagonal. On the note of contrast again, be aware that you will sacrifice contrast in one area to gain it in another.
This can be used to raise or lower the contrast of the overall image with a focus on the mid-tone areas. The bright/dark tone changes of the highlights/shadows are amplified by the mid-tone slope change — so it doesn't take much to really change the contrast.
APPLYING NONLINEAR CURVES
The beauty of the curve adjustment is that you have such a wide range of possibilities — much more dynamic than a single slider adjustment. To apply curve adjustments, you simply click a location on the curve and drag it to the desired location. The curve will bend on its own based only on your set points. You can continue to add set points until you have the desired result.
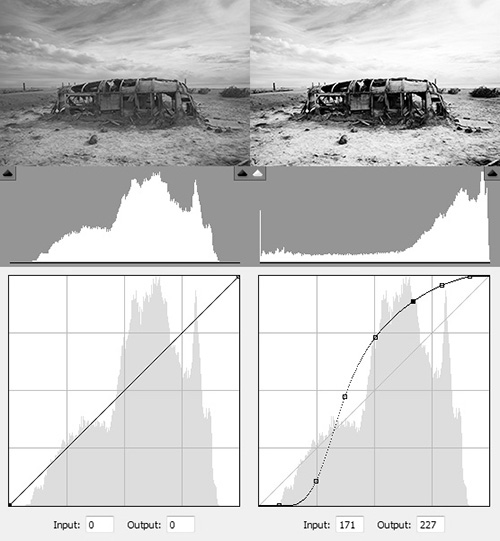
Using the example image above (middle of series), here's one possible curve that combines linear, single bend, and double bend curves. Keep in mind that I haven't applied any basic adjustments and what you're seeing is pure curves from an unprocessed raw file (except for the b/w conversion).

Notice that I used a double bend curve to increase contrast. Combine that with a single bend curve to increase brightness. And combine that with a linear adjustment to set my black and white points. I've also placed several extra points on the curve in order to bend it into the shape I wanted while maintaining a smooth transition.
As you work with curves, you'll noticed that they sometimes have a mind of their own. Extra points will help shape the curve and provide you with the ability to make the adjustments you want. On that same note, too many set points can lead to choppy and lumpy curves. Non-smooth transitions generally begin to produce strange contrast artifacts that are easily seen in the image.
For you curves experts out there, what other tips and advice would you add to this discussion? How are you guys using curves to enhance your images?


My Camera World
February 12, 2010This method allows better control on specific tonal sections within the image as opposed to the nonlinear, which affects almost the whole range.
One thing I like to do is with the curves dialog box is to use mouse over the image and by left-clicking I can see where on the curve the particular tone lies. An then when I want to adjust it, I use Alt key and left-click to set a specific spot from the image as a control point on the curves. I may then add some points outside this range to lock changes, while I manipulate between the 2 set points.
Niels Henriksen
Janne
February 12, 2010It’s perhaps worth noting that “single bend curves” like the ones you show are essentially the same as “gamma adjustment”.
In Gimp there’s a very convenient “edit these settings as a curve” button in the Colors->Levels dialog. You can set the black point and white point, and the gamma there, then do fine adjustments of the resulting curve in the Curves tool.
Brian Auer
February 12, 2010@Niels: Great tips! I’m thinking of wrapping this mini-series up with a post about tips, tricks, and things to avoid when dealing with curves. The trick you mention is definitely worth reiterating.
@Janne: Absolutely! There’s usually more than one way to accomplish the same task with the available tools. One benefit of applying a levels adjustment prior to a curves adjustment is that you have more range to work with in the curves. This is generally beneficial, but I figured I would show the various capabilities of the curve dialog in this series. Maybe we should have started the discussion with levels, eh? 😉
My Camera World
February 13, 2010Here is another tip in using curves to adjust a local spot.
I first open a curves dialog box and focus on just the area I want to change and make the changes. This will at times change similar tones in other parts of the image but that will be corrected with a mask.
I then add another curves on top of this one (just temporary) and make this more extreme in changes. Makes mask edges easier to detect.
I now mask of the best I can using many tools such as wand, or Colour channels and sometimes I will even bring in an ACR copy of image with changes made to make it easier to extra a mask.
Example I will in this copy make the sky over-brighten (lighten blue) and darken edges near sky (if green darken yellow and green). Then I use wand to select.
With the curves at extreme settings I now work the rough edges of the mask and blur for best effect. It doesn’t look right at the moment but when I remove this extreme curve the normal curve with mask looks almost perfect.
I always use the extreme curve to check edges and it amplifies any problems that are barely visible at normal curve settings and therefore hard to get right.
Niels Henriksen