Tone Up Your Curves Skills
Yesterday, I posted a poll asking “How Well Do You Know Your Curves?” and I'm seeing a slightly skewed response toward the “less experienced” side of things. That's totally cool, and I'm glad so many of you chimed in to let me know!
As I gear up to post my next article on “processing via histograms” I'm coming to the conclusion that I should put up a bit of background info on the curve adjustment tool. This tool is deserving of a book just because of the flexibility and complexity that it encompasses… but I'm not going to write a book on this stuff. Instead, I've put together a few thoughts and screenshots followed by links to articles far more comprehensive than my own.
So let's get started with curve adjustments, tones, ranges, slopes, color channels, and all the other associated fun stuff.
Keep in mind that this post is somewhat of a teaser intended to get you thinking about the topic at hand. Read it through, check out the images, and follow the links at the end. I'm hoping that you'll have a better grasp of the curves tool by the time you're finished.
WAIT… WHAT'S A CURVE?
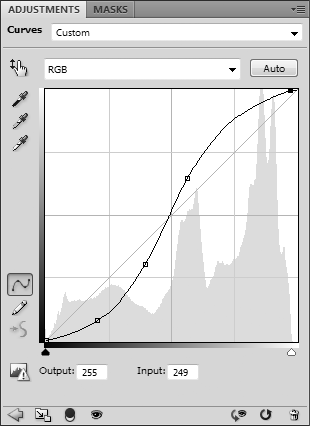
If you've worked in Photoshop, The Gimp, Lightroom, Adobe Camera Raw, and many other pieces of photo editing software, you may have already used curves or at least seen them. It's that box with a diagonal line through it, and you can usually manipulate that straight line into a curve through various methods.

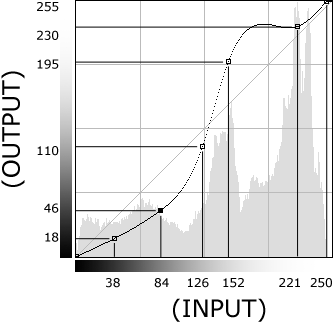
A curve adjustment is a simple input-output tool that changes the tonal value of pixels by stretching or compressing portions of the histogram. So let's say that you want all pixels with the tonal value of 190 to change to 200 (making the light tones lighter). The curve tool does this for you, but it also moves nearby tonal values to maintain a smooth appearance in the image.
Essentially, you need to know that as you move the curve down and to the right, tones will darken from their current values. Move the curve up and to the left, tones will lighten from their current values. A curve can have many bends and inflection points, so it is possible to apply different adjustments to different sections of the histogram.
THE INPUT/OUTPUT RELATIONSHIP
As I mentioned above, you can use the curve adjustment to designate tone transformations across the entire tonal range. If you want one section of tones to become brighter, you move the curve in one direction for that local area. If you want one section of tones to become darker, you move the curve in the other direction for that local area.

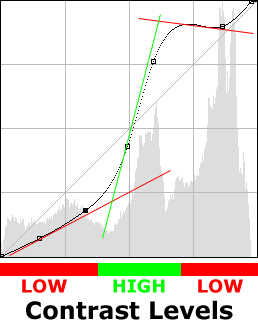
A side effect of curve adjustments is the increase and decrease of contrast for different tonal ranges in the image. The slope (or how steep the curve looks from left to right) determines how much contrast adjustment will be applied to that local area. A steep slope (closer to vertical than horizontal) will give you a higher contrast. A shallow slope (closer to horizontal than vertical) will give you a lower contrast. The interesting thing about the curve adjustment is that slopes changes will alway negate each other. So if you increase the slope in the midtones (thus increasing the contrast) with a traditional s-curve, you also decrease the slope in the highlights and shadows (thus decreasing the contrast).

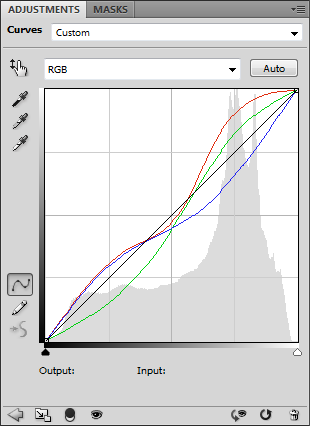
Simple curve adjustments are applied to a combined rgb channel. Advanced curve adjustments can be applied to individual channels in any color space such as RGB, LAB, or CMYK. This type of thing gives you ultimate control of the tones for each color representation in your image across multiple color channels, but it can be difficult to visualize and control unless you have experience with the tool.
PRACTICE, PRACTICE, PRACTICE
To best understand curves, I would suggest starting out with grayscale images rather than color. Working with a single channel will be about three times more clear than working with three channels. This scenario will allow you to explore the relationship between input and output tones without having to worry about color effects.

If you have a good handle on how the curve tool works, try messing with the color channels in the RGB space to get a feel for how they work. It's the same concept as with grayscale, but applied to each color (red, blue, green). You can also convert your image to LAB or CMYK color space and experiment with the curve adjustment.
FURTHER READING
This topic is huge just from a technical standpoint. So rather than regurgitate a bunch of stuff that's already been said, be sure to check out these following articles. I've narrowed my choices down to four articles that I feel cover the main ideas.
Tonal Range and the Curves Tool
This link from Chromasia is actually an entire series of articles on the topic of curves adjustments and everything associated with them. If you have time to read through it, I would highly suggest doing so.
Using the Photoshop Curves Tool
While not as comprehensive as the first link, this article from Cambridge in Colour covers many of the basic lessons in curves adjustments. I like this one because of how concise it is with each topic.
Photoshop Curves: Stepping Up From Levels
This article from Earthbound Light is similar to the previous article, but it hits a few different points and presents the material in a slightly different manner. Both are worth reading.
Color Correction in Photoshop with the Curves Adjustment Tool
And finally, for those of you wanting to dive into color curves, this article from PSDtuts+ gives a good introduction. It doesn't get terribly technical, but it should give you a good idea on how the color channels are affected by curves adjustments.
As I said, this article is just a precursor to my next article on the curve adjustment and how it affects the image and its histogram from a practical standpoint. So if you're unfamiliar with curves, read these links and practice on some of your own photos to get familiar with the tool.
More to come later this week…
Curve Lover
February 3, 2010Nice article. Would love to see some pictures and what the curve adjustments do to them, in your explanations
Brian Auer
February 3, 2010I’ve got a bigger article brewing that will have lots of examples showing histograms and images as we explore the basic adjustments on the curve. This one was meant to be more of a quick intro for the concepts.
Curtis Wallis
February 25, 2010Nice in depth article. Been using curves for years but I learned a few things.