Build a Film Developing Kit for Under $50
The intent of this article is to present a list of one-time expenses for developing your own black & white film. I would guess that many people shy away from film photography because of the cost or difficulty. And I agree that it can get quite expensive if you have somebody else develop your film (if you can manage to find them, especially b/w).
But film photography doesn't have to be expensive. We've already shown that there are a huge number of film cameras out there for under $50, and I wanted to see if I could put together a list of film developing supplies for the same price tag. After a few minutes of research, whad'ya know? Again, for under $50, we can put together a set of black and white film developing equipment. So let's dig in!
THE BARE ESSENTIALS
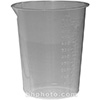 |
LARGE MEASURING CUP
You'll need at least one of these measurement cups (or beakers) to measure out the water for your chemicals. I'd suggest getting a 600ml version so you can use it for double batches or 120 film. You can get 3 of these (1 for each chemical solutuion), but if you're cheap (like me) you can use old plastic cups for holding the chemicals after they've been measured. |
$9 |
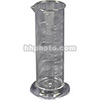 |
SMALL GRADUATED CYLINDER
This guys is used for measuring out the concentrate chemicals, since you might be needing anywhere from 10-100ml of concentrate (if you're using liquid concentrate supplies). Just be sure to rinse between chemical pours and clean very well before measuring out the developer. |
$3 |
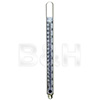 |
THERMOMETER
These cheap-ass thermometers work just fine. They take a while to register the actual temperature, but they work. They're also a handy little stir stick. |
$5 |
 |
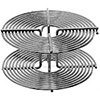
FILM REEL
The cheap film reels will bend-up pretty easily, but something is better than nothing. Just like lenses, buy the best you can afford (you'll save yourself a lot of frustration). |
$10 |
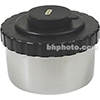 |
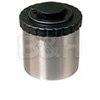
DEVELOPING TANK
I'm hooked on the steel tanks. You can beat the hell out of them and they keep on truckin'. You can really slam them down on the counter to knock the air bubbles off of the film after your inversions. |
$10 |
 |
HANGING CLIPS
I use these clips for film and print. They're pretty gnarly, but they have quite a grip. Useful for when you're wiping down the film at the end. |
$6 |
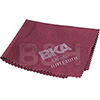 |
DRYING CLOTH
I've tried the film squeegees, but they always seem to leave a bunch of water spots. I like to wipe down the non-emulsion side of my wet film with a good clean micro-fiber cloth to take care of water spots. |
$5 |
| TOTAL | $48 |
OK, so those are the absolute minimum equipment requirements for developing your own black & white film. There are definitely some other items that will make your life easier, but those things aren't always necessary. Again, these things above are the one-time equipment costs. Immediately below, you'll find a list of consumable items that you'll have to buy up-front and periodically throughout your film developing adventures.
CONSUMABLES
 |
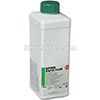
DEVELOPER
Use whatever developer you want, but I prefer to use Ilford's Ilfosol 3 solution for most of my film. The stuff works great on fine-grain film. The only downside is that it's less versatile than other developers… and it's a one-shot. |
$8 |
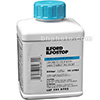 |
STOP BATH
Stop baths aren't as important as the developer, but they do a critical job. I like to stick with the Ilford stop bath just for consistency. * Water can also be used if a stop bath is not available. |
$6 |
 |
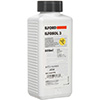
FIXER
Like the stop bath, fixers aren't extremely important, but I like to stay with my brand. You can choose whatever fixer you want. * To clarify this statement, I meant that which specific fixer you choose isn't as important as which developer you use. |
$10 |
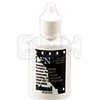 |
WETTING AGENT
For those of us with really hard water, a wetting agent can be a life saver. This little solution helps to clear your film of hard-water deposits while making it dry faster. |
$8 |
* Added for clarification based on reader comments
Remember, these are things that you'll use-up over and over again (in addition to film). They're actually pretty cheap, but you have to remember to keep them stocked so you don't run out and inconvenience yourself. In addition to these consumable items, I've got a list of “luxury” items below that might make your “film developing” life easier, but they aren't completely necessary (unless you're a film addict).
LUXURY ITEMS
 |
CAN OPENER
These are nice to have when trying to pry the bottom off the film cassette in complete darkness. But you can also use some types of regular bottle openers to get the job done. |
$11 |
 |
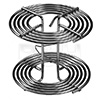
DELUXE REEL
Like I said before, buy the best reel you can afford. Get the cheap ones and you'll be fighting with the film after a couple of rolls. These expensive ones are built to take typical abuse. |
$20 |
 |
DOUBLE TANK
If you shoot a lot of 35mm film (or medium format film), you might consider buying a double tank rather than a single tank. These guys will fit two 35mm reels or one 120 reel. Handy for saving some extra time and effort. |
$14 |
 |
MEDIUM FORMAT REEL
And of course if you're shooting medium format, you'll need a medium format film reel. These guys are easier to load than the 35mm reels, but sill buy a decent one. |
$13 |
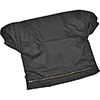 |
CHANGING BAG
Changing bags are helpful if you don't want to seal off a whole room (which is a requirement for loading film on a reel). I don't have one of these, but it sure would save me some time. |
$16 |
 |
ARCHIVE SHEETS
Of course, after you develop you film you'll need somewhere to put it. Use archival quality sleeves to preserve your negatives. And use the 7×5 sheets so you can make contact prints later in your career (yes, I made the mistake of using 6×6 sheets and I'm now regretting it). |
$10 |
I could probably go on and on about all the other pieces of equipment that would make developing easier, but we'll cut it off right here. The point is, you can shoot and develop your own black and white film for a relatively inexpensive upfront cost. Operating costs beyond that are fairly minimal, with the actual film being the most expensive component.
John Milleker
March 10, 2009You can and absolutely will have fun with this $50 developing kit. Many, many years ago I put together a similar selection from recommendation from a friend.
It was the best $50 I ever spent, countless nights in the darkroom watching my film come to life.. Well, if you like that sort of thing.
I recommend, nay, urge anyone who has never developed their own film to give this a try. It’s only fifty bucks – film is getting ‘artsy popular’ again so you could always re-sell the hardware.
Don’t forget that most of the chemicals are reusable – the bottles will give you a formula on how many uses each chemical has and any adjustments you need to make after so many uses.
-John
the_wolf_brigade
March 10, 2009"Like the stop bath, fixers aren’t extremely important"
I’m reasonably sure that you didn’t quite mean it the way you wrote it. Fixer is extremely important as it stops the film being sensitive to air. Stop bath on the other hand is almost a luxury in that water can be used instead – I can’t buy stop bath where I am so I use water.
I don’t wipe my film either as I always ended up with scratches. The wetting agent (I use Photo-flo) has been a life saver.
I also started out using clothespegs for the film to save money, and for a darkbag I used a heavy jacket rolled up using the sleeves to put my hands through.
A syringe comes in handy for even smaller measurements when you want to be accurate.
Tobias Stadler
March 10, 2009Your either unrealistic or very lucky.
Because here in Austria, I would pay around 50€ just for the chemicals!
But I still love my darkchamber 🙂
Janne
March 10, 2009Somewhat different priorities for me:
Absolutely get the changing bag – it’s much quicker to use than sealing a whole room, and a lot easier when you can sit at the kitchen table and you’re not fumbling around in total darkness.
I’ll add a stopwatch or timer of some sort with a seconds display. An ordinary clock is a bit too inconvenient; I tend to end up forgetting how many minutes I’ve gone already.
I’ve never used stop bath, and neither film nor fixer seem worse for it. I rinse the film using the same schedule Ilford recommends for the final rinse stage (5 inversions with water, 10 inversions with water, 20 inversion with water).
I guess film clips are fine. I use those small black, triangular paper clips you have everywhere in a typical office. They’re cheaper even if you buy them yourself, and of course, if you happen to work in an office a couple of them can be had for free.
I also don’t use anything to dry the film. I’m really afraid of getting scratches from doing it. I don’t hang he film to dry anymore either, but dry it rolled "backwards" on a fluffy towel. The water just has to travel the short distance to the long edge, and drying it rolled "backwards" makes the film pretty flat widthwise, which is great for when you scan it. Shot of it here: https://www.flickr.com/photos/jannem/3143491435/
Brian Auer
March 10, 2009@John Good point on the chemicals. It’s smart to pay attention (especially with the developer) to the working life of the solution. Some developers are single-shot (use once, then throw away) while others can be reused for many rolls of film. Stop bath and fixer are generally reused for many rolls, but you still have to pay attention to the age of the solution and how many times it’s been used.
@Tobias I guess I don’t know what the typical costs are in most other countries. But in the US, this isn’t unrealistic — even if you were to buy these things from a local shop rather than a huge online vendor like B&H.
@Janne Yup, sealing off a room definitely sucks. I’ve got a huge blanket that gets draped over the door, I shut it, then stuff it under the door to block the remaining light. I also only work at night with most lights out in the house so any stray light leaks won’t do as much damage. Timers are good to have, but I’m assuming most people have some type of timer at their disposal. Heck, I sometimes use the timer on the microwave if I’m working in the kitchen. Good call on those clips too — those things usually have good bite.
@the_wolf_brigade You know what I meant… fixer is fixer (for the most part). It’s not going to effect the outcome of the film like the developer will. I’ve only ever used the Ilford Rapid Fixer, but I’ve used several different developers because of specific needs. I wasn’t wiping my film at first either, but I was still getting water spots on the non-emulsion side and I was getting blotchy mineral deposits on the emulsion. So now I squeegee off most of the water and wipe down with a microfiber to get rid of the streaks and remaining water. It’s a strange feeling wiping down the emulsion (kinda sticky), but I haven’t seen a single scratch resulting from this yet.
Jeff Begley
March 10, 2009USE DISTILLED WATER! I use distilled water for the developer as well as the final bath with wetting agent. It is most useful for the final bath. I don’t wipe the film in any fashion when I let it dry as I HATE scratches. Water spots are caused by minerals in the water. Distilled water has no minerals, ergo no water spots! At $1 or $2 a gallon it is well worth the cost.
the_wolf_brigade
March 10, 2009Actually fixer will affect the outcome of the film in a similar way to developer, though this is less prevalent these days. The majority of easily available films require a rapid fixer only though some specialty films (I think Efke IR?) require a hardening fixer as the emulsion is very soft.
It’s a very good guide you’ve got there, though the chemicals are the hard part in terms of recommendations, since not everyone will be able to access the same films.
Brian Auer
March 10, 2009Good point, at least for the final wash with the wetting agent. This is a habit I should probably get into.
Brian Auer
March 10, 2009Hmm… I was aware that there are hardening and non-hardening fixers, but I’ve always been told to use the non-hardening fixers (though I haven’t used too many specialty films). I considered leaving out the chemicals entirely, but I wanted to show that these are the types of things you have to buy periodically.
LOL, it’s funny how all the film photographers come crawling out of their darkrooms the instant something film-related is posted.
Marah Anderson
March 11, 2009Thanks for the tips, everyone. I just took a darkroom class and learned how to do all this stuff. I’ve been thinking about starting to develop film at home, and this post further encourages me.
Maybe further down the line I might even put in a darkroom to make prints at home, but this will be my starting point.
the_wolf_brigade
March 13, 2009@Brian: It was definitely a bold move including chemicals! Everyone will have their own preference and that will aslo depend on what they can obtain. I’m trying to use as many different types as I can so I can find a combo that works for me, but what I’m finding is that it really depends more on the film and how you want that to look. Using the same film but two different developers can change the entire outcome.
I’m pretty sold on Rodinal and Tmax at the moment though – very sharp negatives. Unfortunately I’m out of Tmax again so it’s back to HP5….
Ed Z
March 13, 2009Hey Brian. It’s funny you should write this, I’ve actually just started processing b/w film again after a many-year hiatus. I’ve been using Diafine as a developer and I absolutely love it – it’s just about the easiest way imaginable to develop.
Nick
March 13, 2009Just be aware that after you take the first step (developing your own film), you’ll want to get an enlarger and start making your own prints. I got into Black and White years ago. I was so pleased after my first film developing effort until I realized that you can’t really stop there. Fortunately I believe that you can buy a decent enlarger these days for very little, and if you have the space for a darkroom, by all means give it a try. It’s completely addictive though, and tons of fun. Oh, and don’t forget a bulk loader. You’re going to shoot LOTS of film.
Rofikul Islam Shahin
March 15, 2009Wonderful post. I’m quite new to photography but really started to like it after getting a new camera. I love it. I was googling for cheap setups and bumped into your site. Good post 🙂
Joev
March 21, 2009you could always use some vinegar diluted in waterfor your stop bath, i does the same as a stop bath and is much better than plain water
Latente
April 1, 2009@tobias
50€ for chemicals? did you buy tmax chemical?
D76 1l 6,00€
Agefix 1,25l 7,9€
Aepon 250cc 4,90€
—————————–
18,80€
https://www.fotomatica.it/
Ryan Gladstone
March 4, 2010Thank you. Thank you. Thank you for assembling this guide! I want to start shooting some film again but couldn’t for the life of remember all of the pieces I need to get going. I wasn’t about to buy one of those over-priced kits, either. I just bought most of this (using the affiliate link) as an early birthday gift to myself.
Geo
March 5, 2010Thanks for the handy guide. I am attending The School of Photography at Orange Coast College in Costa Mesa, California. While the school has cameras, tripods and printing ad developing supplies aplenty, the lab hours have been cut severely because of extreme budget constraints (this is in 2010), and I have had to put together a developing supply and equipment package for myself at home. Since I also work a full week, the hours I need are often closed to me. Your guide is indispensable! Thank you very much, and thanks also to the commenters. Now as for printing, that’s another matter entirely. Not yet ready for an enlarger, thanks anyhow!
lizzard_nyc
May 5, 2010Thanks for the information.
I will head down to Adorama tomorrow and see about getting this equipment for developing my own 120 film.