Cross Processing Tips and Suggestions
It's no secret… I love film photography. But if there's one thing I love more than film, it's cross processed film. There's something so intriguing about it — adding a touch of unpredictable to the imperfect nature of film. Many photographers tend to either hate it or love it. Some love it so much that they attempt to recreate the look with Photoshop.
I've had this article on the half-finished backburner for a while. I figure we'll take a slight detour from the photo backup series and get this one out there. One reader recently commented on another cross processing article, asking some questions about it. So I'm guessing that at least one person will find some of this useful.
Here are some tips for choosing films to cross process, exposing the film, getting it developed, and color correcting it. So grab a cheap film camera start cross processing!
WHAT THE HECK IS CROSS PROCESSING?
It's a beautiful thing… simply put, you shoot a roll of film (most commonly slide film, or E-6) and develop it as if it were something different (most commonly color negative film, or C-41). Intentionally processing a film in the wrong chemicals. Doing this with slide film works out well for several reasons: the results are very cool and C-41 processing is much more available than E-6.
DIFFERENT FILMS = DIFFERENT RESULTS


The largest differences in the outcome of your cross processed photos have to do with the film you're using. Each film has it's own unique look, and they can vary drastically. The most obvious difference is the color cast produced during development. Here are some results from those that I'm most familiar with:
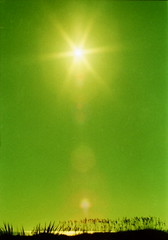
Kodak EktaChrome (or EliteChrome) = very green
Fujifilm Velvia 50 = green + some blue
Fujifilm Velvia 100 = very red + some magenta or yellow
And here are some others that I have yet to try:
Fujifilm Sensia 400 = blue + green
Fujifilm Sensia 100 = red
Fujifilm Provia 400 = green + yellow
Konica Centuria 100 = little color cast
It's also worth noting that different developer solutions will have slightly different effects on the outcome of the film. For any given slide film that can be cross processed, I've seen a vast array of colors show up from different photographers.
UNDER-EXPOSE BY ONE STOP
Color slide film has a lower dynamic range than color negative film. On top of that, cross processing tends to boost the contrast between highlights and shadows, thus requiring that you properly expose your shots. But cross processing (in my experience so far), tends to over-expose the film by about one stop. The first few rolls I got back were overexposed — some being unusable. So I figured out that if I underexpose the shots by one stop, I got better results with the exposure of the developed film.
To underexpose by one stop, you just have to set your ASA/ISO value to double what it should be (assuming that you have a light meter on your camera). So if you're shooting with ASA100 film, set the camera to ASA200. This makes the camera “think” that you have a faster film loaded, so it lets in less light.
FIND A GOOD PHOTO LAB
Cross processing requires the C-41 process, and most of us aren't equipped to do this ourselves. However, just about any lab that develops film will have this capability (since it's the most common process for consumer film). The tricky part is finding somebody who will cross process your E-6 film as C-41 film.
When film is developed, a lot of chemical reactions are taking place. The end result is a stable piece of film with an image on it and a bunch of extra “stuff” that gets left in the developer solution. Developer solutions have to be changed out on a regular basis to continue to work properly.
From what I understand, developing slide film in C-41 chemicals can leave behind stuff that normally isn't left behind. I don't think this does a great harm to the solution or to the other film being processed in the developer, but shops with less-experienced technicians will shy away from cross processing because of this. You're better off finding somebody who knows their stuff.
It's also recommended that you find a shop with a higher volume. Developers that are used more often have their solutions changed out more often. For example, I've got a place downtown that changes the solution every day, and they have no problem cross processing as much as I want. But my local place has a lower volume and they only change out the solution once per week. They'll cross process for me, but they ask that I don't bring in more than a couple rolls at a time.
CORRECT THE COLORS WITH WHITE BALANCE

As I mentioned above, cross processing can produce some very strong color shifts in addition to other things. Sometimes these color shifts work really well with the subject and you'll want to keep them. But other times, it'll be too much an you'll want to back it off a bit. This section is aimed at those of you scanning your film and processing the digital files (but this can also be done in the darkroom).
The best tool that I've found for this is the white balance adjustment found in software such as Adobe Camera Raw or Lightroom. A color curves adjustment in Photoshop might be slightly better, but the white balance is so quick and easy in comparison.
For photos with a strong green color shift, increase your “tint” into the magenta region (or away from green). Depending on the film and the specific color shift, you may also need to adjust the “temperature” toward yellow or blue to take care of secondary color shifts left behind.
For photos with a strong red shift, move your “tint” into the green region (away from the magenta). Again, you may have to adjust the “temperature” to clean up the rest of the colors.
The same rules apply with yellow and blue color shifts — just move adjust the white balance in the opposite direction. So basically, you're just evaluating the color shift of the photo, finding that color or combination of colors in your white balance adjustment, and compensating for it by negating the colors.
Another thing that works well with Adobe's raw processor is the White Balance Tool even with cross processed film scans. Just find something in the photo that “should” be a neutral gray and sample it with the tool. This will adjust the white balance for you, then you can fine-tune it from there. I usually like to leave a bit of color shift in my photos (and sometimes all of it) — if you go too far with the white balance adjustments, you'll start to see weird colors showing up in those neutral gray or white areas.
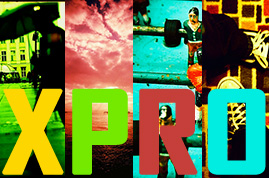
JOIN AN XPRO FLICKR GROUP

If you're on Flickr, one of the best ways to get excited about a topic is to join a group dedicated to that topic. Seeing the photos and reading the discussions is a great way to get inspired and educated. Here are a few cross processing groups:
XPRO CROSS PROCESSING
Cross Processing – XP – XPRO
Kodak Xpro
Cross Process Masterpieces
Cross Processing Anonymous
Other than that, all I can do is suggest that you get out there and try things out for yourself. Try different films, different cameras, different developers, etc. Cross processing can be quite interesting, as it adds to the “unknown” factor already inherent in film photography.
For you seasoned cross processing film photographers out there, what other advice would you give to photographers just getting into this stuff?
XA2/2
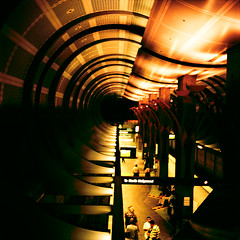
October 16, 2008great article, just what I’ve been looking for. and that pic of the pier by slimmer jimmer… its in Brighton where I live (that’s in the UK )…cool!
Rick Hanzlik
October 16, 2008To date I haven’t tried “messing” with the white balance or any of the other effects I can produce with my camera or photoshop. Seems I always to busy just producing the portrait and paying the bills. Think it’s time to play a little. Thanks for the Ideas!
Rick
RH
October 21, 2008Wonderful info, Brian! I particularly like the color comparison between the different slide films. The yellow and green shifts are my favorites, so I’ll be trying the Ektachrome and Provia as soon as I can. Thanks for a great resource!
J
November 11, 2008I just took my slide film in and got it cross processed and it came back as a roll of negatives… is there a special way I am supposed to request it to be cross processed in order to get a nice print of it?
Brian Auer
November 11, 2008Sounds like you did it right — when slide film is cross processed it turns into a negative. If it’s something like a Velvia 100, it should look very blue/green (which turns red/purple when inverted). If it’s something like an Ektachrome, it should look very purple/red (which turns green/blue when inverted).
If you want prints from the lab, they should be able to do it like any other color negative. If you’re scanning, your scanner should have the ability to invert the colors — if not, Photoshop (and other editing software) does this too.
jordan
December 1, 2008Such a fantastic, informative article, exactly what I was looking for! Thanks so much 😀
Cam
December 14, 2008Hello :]
I have just got my first roll of xprocessed film back from the developers (COSTCO)
I have scanned my images but they all seem very grainy……
Any ideas???
Can anyone suggest any films 2 try????
Cam>>> x :]
Keith
February 9, 2009I must admit I find it insightful to read your blogging. Keep up the good work. I’m on flickr and i’m going to join one of those groups as well.
rebecca ayse
May 16, 2009I gave my slide film to a friend who works in a photolab at the local rite aid, and accidentally she processed it in C41 chemistry.
my result: i like the overall effect of it now, though i will play with it to make it less orange! (thanks)
other than that i also have used slide film in a cheap fisheye camera (the exposure was off creating another similar, creepy effect.)
has anybody used this technique for fashion-esque photos?
i’m about to shoot another roll and i wanna know what works best with cross processing (dont want to risk ruining any photos!)
Maja
May 22, 2009Hello! That’s great stuff, exactly what i was looking for..so i just wanna ask some things cause I’m doing this for the first time. I have a fujifilm provia 400, i don’t know yet with which camera i’ll shot, with smena 8 or zenit 11. with smena i set everything approximately ( it usually turns out good), so maybe it’s better to do it with the zenit. so i only have to underexpose the shots a bit, and that’s it. on the zenit i can’t set the asa/iso value higher than 400, so i’ll do it again approximately by closing the shutter for one step or setting the time of exposure a bit faster. that should be right then?
or should i first try to shoot with normal exposure settings?
thank u very much!
Brian Auer
May 22, 2009You might just try to shoot with normal exposure and see what happens. Each film seems to react slightly different to the process. It may be totally fine, or it may be slightly overexposed. Either way, the shots should still be quite usable.
Ari
June 21, 2009Hi,
I shot some Fujicolor Superia (100 ASA). Wondering which process to request in order to get a high-contrast image. I did not choose a higher ASA setting on my camera, will I suffer from overexposure if I try to xpro?
thnx!
photog
December 3, 2009cross processing is lame. It is an attempt to make bad photography look like “art”
Brian Auer
December 3, 2009Ignorant remarks are lame. (I would continue this thought, but I don’t want to bring myself down to that level)
tebeccs
December 5, 2009its really cool that people bash what they most likely fail at.
C B
January 27, 2010You put out some great information here. I have some Ektachrome that I plan to cross process. I was wondering if shooting it through a red filter would make it so the green wasn’t so extreme? I’d rather mellow it a bit right on the film rather than scan and modify it. I’d like to be able to do a slide show that wasn’t a green theme. I don’t mind some color shifting but I don’t want to be sick of looking at it after a few slides on the big screen. Or would that affect the dyes on the film in a way that it wouldn’t process right?
Brian Auer
January 28, 2010I’m not sure what would happen if you shot with a color filter… it might work, but it might also take some experimentation to get the filter strength and color correct. I don’t think it would affect the dyes to make the film process incorrectly.
Regardless, you’ll be scanning them anyway for a digital slideshow since the cross processing results in negative images. The color correction is easily done via batch processing and it should get you close on most shots.
C B
January 28, 2010Oh, you just explained an important point that I had overlooked. I was talking about using a projector on a screen not a digital slide show. But now I get it that the resulting negatives are negative so they are really only suitable for making prints. That’s OK because I do have a darkroom and a scanner that will scan negatives or slides. I was really hoping to use a projector. I guess I’ll have to re-think my plans. I’m still going to try it I’ll just have to set some film aside to make positives with.
I have some antique film coming in the mail (eBay). I think some of it’s E-1or E-2 process. I know some color shifting is built in already since it’s so old. Will E-1 or E-2 film cross-process with C-41 chemistry? Or should I just sell it to someone who’s a collector and buy E-6? I don’t want to pay the big bucks to have it processed E-2.
Brian Auer
January 28, 2010I really don’t know about E-2 stuff. I did find a discussion about it at photo.net: https://photo.net/film-and-processing-forum/00DzKU
M.Imran
February 13, 2010hi,
thats very informative article, exactly what I was looking for!
thanks
CB
February 15, 2010Yes a lot of very useful information here. I forgot to thank you for finding that information about the E-2 processing.