Your Guide to Adobe Bridge: Useful Tips and Tricks

In the last part of this series, we went over Organizing your photos with Adobe Bridge (Part of the creative suite). That marked kind of an endpoint for my basic workflow, but I still had a few Bridge features that I wanted to talk about and expand upon.
This article will cover the Bridge keywording features, more productive ways to process RAW files, taking care of dust bunnies, hooking into Photoshop's batch processing feature, and clearing up some visual archive clutter with stacks. This article also marks the near end for the whole series, and the final article will recap everything we've talked about.
FOLLOW THIS SERIES OF ARTICLES!
VISIT THE TABLE OF CONTENTS
BACK — ADOBE BRIDGE ORGANIZING
NEXT — ADOBE BRIDGE FROM START TO FINISH
IN-DEPTH KEYWORDING
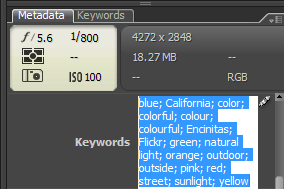
Back in the File Preparation article, I briefly mentioned keywording, but I didn't talk a whole lot about how to do it. Keywording can be done in one of two ways with Adobe Bridge: typing semicolon-separated keywords into the Metadata Panel or clicking the check-boxes in the Keyword Panel. I use both methods depending on the situation.

Keywording via the Metadata Panel is generally faster than searching through lists of keywords that you have archived. The problem with using this method is that it can't be used when you have multiple images selected that already contain different keyword values. In the “Keywords” box you'll see “(Multiple Values)” rather than the keywords. If you type anything in that box, you replace whatever information was there with the new information. So this method of keywording is good for groups of images with no previous keywords or single images regardless of their keyword situation.
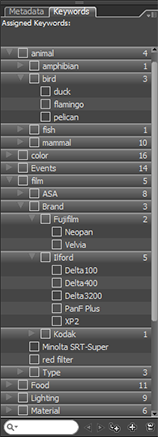
Keywording via the Keyword Panel is a little slower than typing things by hand. The nice thing about it, though, is that it can handle adding keywords to multiple files with pre-existing keywords (even if they're different from each other). The other great thing about the Keyword Panel is that it serves as a keyword archive and it sort of reminds you to use keywords that you may have otherwise missed. I'll typically use this method of keywording for the more detailed work after the images have already had a first coat of keywords. Adobe bridge tagging is another way to think of this.

USING THE KEYWORD PANEL
Organizing the keyword archive is fairly simple, but it's not a completely automated process. When you keyword things by hand in the Metadata Panel, Bridge makes a note of this and places these keywords and phrases in your Keyword Panel under “Other Keywords”. These keywords can be moved around and stuffed into other categories for permanent archiving.
To create a new category, simply click on the plus sign at the bottom of the panel for a “New Keyword”. This inserts a top level keyword that can be used as a category or grouping for other keywords. Once you have some top level keywords, you can add “New Sub Keywords” by selecting they keyword you want it under and clicking the plus sign with an arrow next to it. Sub Keywords can even have their own Sub Keywords, as shown in the screen shot for my “film” category.
Moving and organizing existing keywords is simply a drag-n-drop operation. Keywords can also be renamed and deleted. The easiest way to build up your keyword archive is to do it as you go. Don't bother spending hours plugging in keywords that you think you'll use later — make good use of your time and do it while you're actually keywording photos. And one last tip for the Keyword Panel… try to keep your keyword groups filled with less than 10 or 15 keywords. Any more than that and you can probably create some new sub-groups. Too many keywords in one list only makes it more difficult to find them.
Do your keyword archiving correctly and adding those words and phrases will be a snap. You'll be amazed at how many keywords you would have forgotten if you hadn't run down your list and started diving into your categories and sub categories.
COPY AND PASTE ACR SETTINGS
As I mentioned in the File Processing article of this series, you can process multiple images inside of ACR to speed things up. Well, we can do the same thing without even bringing the images into ACR or Photoshop. If you have a group of photos with nearly identical lighting conditions and exposure, you can process one file and apply those settings to the other files from Bridge (I also mentioned this as an afterthought in the article).
To review: after you process your file, select the thumbnail inside of Bridge and copy the “Development Settings” via the right click menu, edit menu, or press Ctrl+Alt+C. Then select the images you want to apply the settings to and use the menus or press Ctrl+Alt+V to bring up the dialog that lets you choose which settings to paste over.

One of those settings is for “Spot Removal”. A neat trick you can do if you have a bunch of images with nasty spots on them, is to remove the spots on one image (via ACR's healing tool) and do a copy & paste to the other images for only the spot removal. Now you don't have to click every spot in every image.
BATCH WITH PHOTOSHOP
One thing I absolutely love about Bridge is the ability to batch process photos with Photoshop Actions… without manually opening those images in Photoshop and running the actions. If I process a photo with ACR and it doesn't need to be opened in Photoshop, I don't open it in Photoshop. But if I want to post that photo to Flickr at a smaller size, correct color space, etc., I have to use Photoshop.
But since I created a few actions for resizing my Flickr photos, I can carry out that task as a batch process. Just select one or more photos that you want to batch, go to your “Tools” menu, navigate down to the “Photoshop” menu, and select “Batch…” to bring up a dialog box. In fact, it's the same dialog box that you can access from Photoshop itself.
The “Batch” dialog gives you options for the photo source, destination, and errors. Explaining every option in this dialog would constitute an article of its own, so I won't mention everything about it. When I'm working with Adobe Bridge CC, my source will be set to “Bridge” — this just uses your previous selections for the batch. I also suppress open file dialogs and color profile warnings to ensure that the batch can run uninterrupted. These things can be dealt with in your Photoshop preferences. For my destination, I leave it as “none” when I'm just resizing for Flickr since my action saves the downsized file.
USING STACKS
Do you ever end up with hundreds of photos from a single shoot that end up in a single folder? Are any of those photos basically the same as some others? If you don't want to get rid of those similar photos, you can at least condense your archive visually. Stacks are kind of like miniature folders, but without the folders.
To create a stack, select the similar images and press Ctrl+G to “Group as Stack” or use your “Stack” menu or right click menu. This brings all the selected photos together and frees up some space on your screen. The stack can be expanded, condensed again, or ungrouped (check the Stack menu for the shortcuts).
I don't typically use them unless I have a lot of photos in a single folder. They're handy if you like to go crazy with the rapid fire, because a lot of bulk comes from all those slightly different photos.
WHAT'S NEXT?
That's pretty much all I've got in me at this point. The last article in this series will be a recap, or course outline, for everything we've covered. I've only been using Bridge for a few months now, so I'm sure there are other features, methods, and tricks that I haven't touched on. There's always a possibility for a follow-up article sometime down the road.
If you guys are interested, I could possibly start another series on Adobe Camera RAW. I've been using it heavily for a little while now, and I'm getting to the point where I'm comfortable with the basic stuff for working with color and black & white photos. It's really not that scary! And it uses the same RAW processing tools at Adobe Lightroom.
FOLLOW THIS SERIES OF ARTICLES!
VISIT THE TABLE OF CONTENTS
BACK — ADOBE BRIDGE ORGANIZING
NEXT — ADOBE BRIDGE FROM START TO FINISH
Here’s a video I found that goes well with the content discussed in this article.

Angela
June 18, 2008The info on keywords is great.
Is there a way to share keywords between different users on different computers? We’d like to tag a photo archive with keywords, as well as new photos that we add to the archive. It would be nice if all users could work form the same list of keywords.
bee
September 7, 2008Thank you so much for your Bridge guide! I’ve downloaded it and worked my way through it for the last 1,5 hours. I knew quite a bit before, but learned some great stuff today! Especially about importing the photos from the camera and keywording them directly in this progress, that’s just great. I really appreciate this guide.
Thanks again,
bee
Natalia
November 11, 2008Brian,
I stumbled upon your Bridge guide and I have to say I am so relieved! I was starting to dread the idea of manually resizing photos one by one and I could also picture myself spending days digging around for a specific photo. Now I know that Bridge is the solution! I already had Bridge but I might never have gotten around to learning how to use it without your help. Thanks for putting the guide together!
Natalia
Darron Mark
July 7, 2009Fantastic post, I’m a big fan of Bridge and its nice to see that there are even more ‘little’ features in there that I’m possibly not taking full advantage of.
de koila
July 9, 2009Hi.. thanks for all this useful information. I have though encountered a problem that I cannot resolve by myself and cannot find any relevant information. I hope you can help: In some cases (this has only been happening with my last big job of about 1000 selected images which are divided in subfolders) in most folders when I try to apply a new keyword in an entire group of photographs I get the message “.. the metadata of some of the selected items cannot be changed. Do you want to continue and apply the changes to some of the selected items only?..” whilst when i select individual files (photographs) I get the message “.. the file xxxx.CR2 cannot store XMP metadata. No changes will occur..”. This has been happening both before and after the batch rename processing. Also I noticed on my desktop that the RAW files that do not accept keywords are not initially accompanied by an XMP file. I guess that there is a problem with my ‘settings’ but I cannot located it or resolve it… Can you help please?
Incredibler
May 4, 2010de koila, were you able to solve this problem? If so, how? I am having the same problem…