Your Guide to Adobe Bridge: Importing

In the last post of this series we talked about the workspace of Adobe Bridge. Various layouts, panel functionalities, and a few of the basic controls. Now that we have that under our belts, we can begin our journey into actually using the software. Like I said before, I'll be stepping through my workflow from the beginning — so we'll start with importing our photos from the camera to the computer.
I realize that there are probably several dozens of methods for importing photos, and we all have our preferences for one reason or another. What I'm going to show you is how Bridge can make quick work of importing photos. Not only that, Bridge has the capability to automatically alter the files as they arrive, thus increasing your productivity.
FOLLOW THIS SERIES OF ARTICLES!
VISIT THE TABLE OF CONTENTS
BACK — ADOBE BRIDGE WORKSPACE
NEXT — ADOBE BRIDGE FILE PREPARATION
CREATING A METADATA TEMPLATE
Wait a second… aren't we supposed to be pulling in those files? Not yet padre. If you don't have any idea what a metadata template is, or if you haven't set one up, do it now — immediately. This little step will save you a ton of time and it will make your files far more rich with metadata.
Basically, you can create a template filled with IPTC metadata that can be applied to your photos as they are imported to your computer with no extra effort.
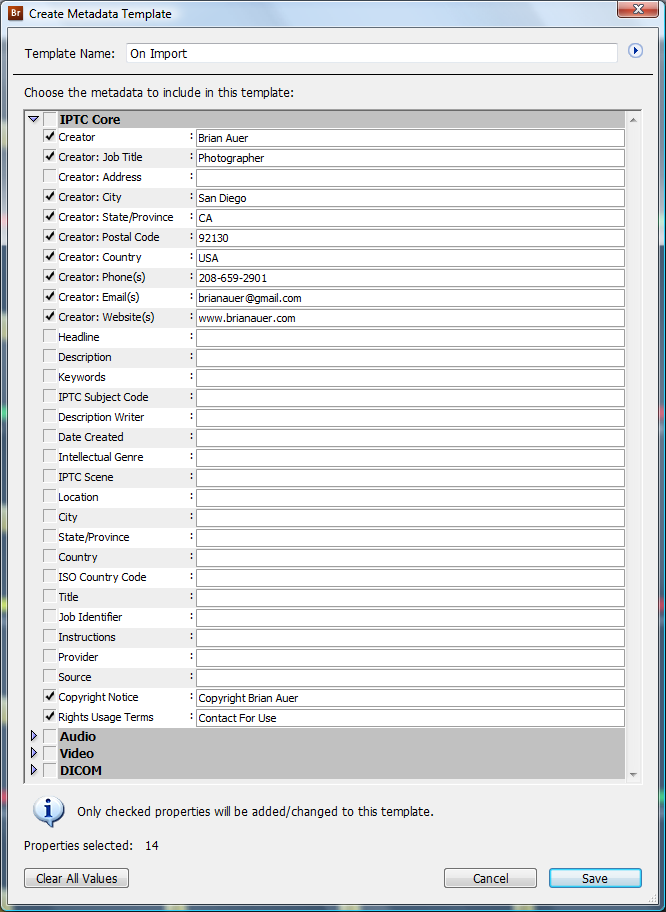
If you look under your “Tools” menu you'll see a “Create Metadata Template…” option. Click on it. A dialog will pop up that contains empty fields for all of the IPTC, Audio, Video, and DICOM metadata. The last 3 aren't of terrible use to photographers, so I'll focus on the IPTC fields. To create the template, simply fill in the parts that you'd like to be applied to EVERY photo you import under this template.
I choose to fill in things like my name, location, email, phone, website, and copyright info. Most of the other fields will either vary photo to photo, or it just doesn't get used. I'd suggest that you create at least one generic template for yourself, and you might even want to create others. You could create templates for different clients, cameras, locations, or whatever.
OK, so when you're done, give your template a name and save it. Now we're ready to import.
IMPORTING PHOTOS THROUGH BRIDGE
Prior to importing, you'll need to connect your photos to your computer. Go ahead and do this however you normally would. If you use a card reader, plug in the card. If you connect the camera through a USB cable, plug in the camera. Now ignore or close any pop-ups or dialogs that show up from the operating system or other software — we'll be pulling in the images through Bridge to your computer. Also let me make this clear: Adobe Bridge does not store your files or place them in a database — the software is only a functional window to your existing file structure on your hard drive.
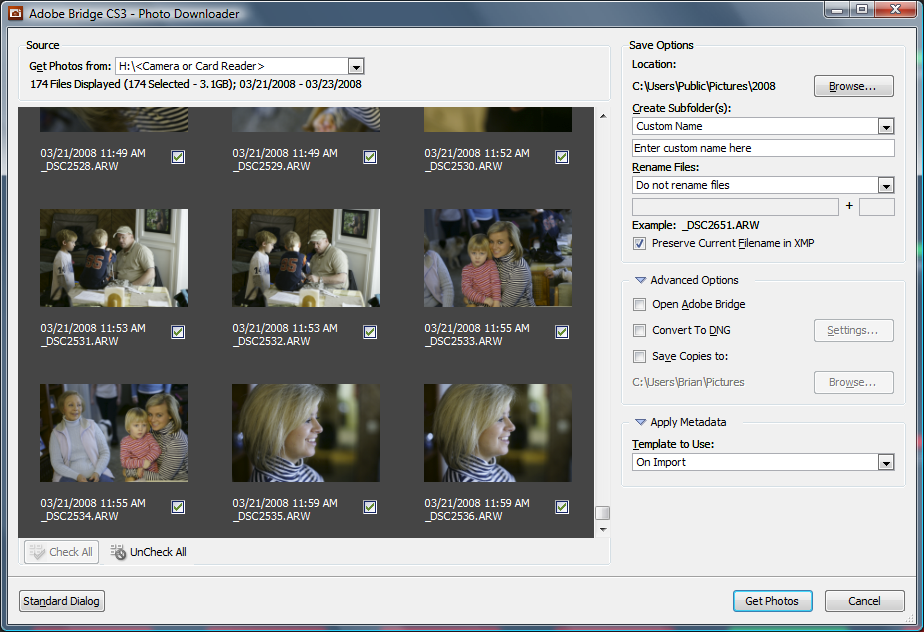
To open the Photo Downloader dialog, look under your “File” menu and choose the “Get Photos From Camera…” option. Initially, you may be looking at a blank window. You'll need to choose the source location of the photos in the upper drop-down menu. Once you choose the source, the preview window should populate with thumbnails of your photos with little check boxes below them. Only the items you have checked will be imported when you press “Get Photos”, so you could split up your download into multiple folders if you had several days worth of images on a single card.
In addition to choosing which photos to download, you have three sets of options that tell Bridge what to do with those photos as they are downloaded. The “Save Options” have to do with file and folder names. First, browse for a location on your hard drive that you'd like to import the photos to. Then choose a method for creating a subfolder if your main location is merely a directory of subfolders. Bridge gives several options for creating subfolders (all having to do with the date), but I use the “custom” option so I can use a more descriptive folder naming convention. You can also choose to rename your files on the fly with some simple rules, but I choose to bypass this option so I can take advantage of the more powerful batch renaming function within Bridge (we'll get to this in the next part of the series).
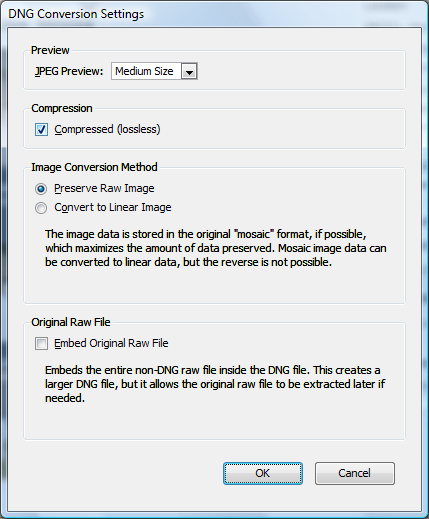
The “Advanced Options” are fairly self-explanatory. There's an option to open Adobe Bridge after importing, which is only useful if you use the import dialog without opening Bridge first. You can also save copies of the files to another disk location. The one option that might be useful, depending on your preference for file formats, is the “Convert to DNG” function. I won't get into DNG files right now, but just recognize that they're a type of standardized RAW file. If you typically convert all of your RAW files to DNG, this little option will take care of it for you while your photos are downloading.
The last option in our “Photo Downloader” is for applying metadata. So all that junk up above about creating a metadata template… this is where we use it. Simply select your appropriate template, and all of your photos will have the metadata attached as they make their way onto your computer. Do note that the option to apply metadata is only available in the advanced dialog, so if you're seeing the standard dialog without thumbnail previews you'll have to switch over.
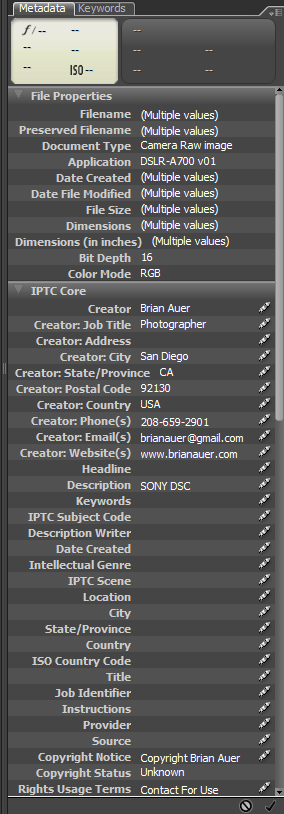
After all of your options are set, press the button and let Bridge do its job. Once the photos have been downloaded, they'll be located on your hard drive right where you specified. And if you check on your metadata (and if you used a template), you should see the appropriate fields populated.
METADATA AS AN AFTERTHOUGHT
So let's say you really like this metadata template thing. Awesome, but what about all those photos that already exist on your hard drive? Since you just created your template, those photos never had a chance to get all that extra information applied to them. No problem, we can fix it.
All you have to do is jump into a photo directory and select all of the photos you want to apply the template to. Now look under your “Tools” menu and click on the “Append Metadata” or “Replace Metadata” option followed by the template you want to use. Appending will only replace the empty fields with data from the template, while Replacing will overwrite anything that was already there.
So there you go, now you can use your template(s) to reach back into your archives and populate some of that metadata you had previously left blank.
WHAT'S NEXT?
In the next part of this series, I'll move on to my next few steps in my workflow. After importing my photos, I immediately knock out any complete duds. Then I rename all of my files with a handy batch process. And before moving on to the next big step, I apply a few keywords to help me with the task of processing my RAW files. So stay tuned, because we're just starting to hit the fun stuff!
FOLLOW THIS SERIES OF ARTICLES!
VISIT THE TABLE OF CONTENTS
BACK — ADOBE BRIDGE WORKSPACE
NEXT — ADOBE BRIDGE FILE PREPARATION
Here’s a video I found that goes well with the content discussed in this article.
Jim Goldstein
March 26, 2008Nice work on this series Brian. I’ve been swamped as of late, but am catching up. It’s interesting to see the common features that have been carried over in Lightroom. Bridge so far seems to have its own flavor of specialization. In the end its all good. Keep up the great work.
Brian Auer
March 26, 2008So I’ve heard… I have yet to try out Lightroom. It makes sense that the two are very similar though. I’m sure they each have their little benefits and drawbacks.
libeco
March 26, 2008Interesting! I never use Bridge to import pictures from my camera. Will certainly try this soon!
Susheel
March 26, 2008Brian… Good post. I see that you’re really taking to Bridge… for a long time Bridge was my best friend, helping me locate and segregate many Adobe Illustrator files that I just would not have had the time to sort through. It is a great application Integrator (“Bridge”… possibly?) and I still do use it to rank and segregate my photographs.
Having said that, I think that Adobe Lightroom is a Very Powerful tool for photographers. If you don’t plan on buying it, you should at-least use the trial version.
Cheers!
Brian Auer
March 26, 2008I’m definitely liking Bridge! I was using Picasa prior to this and I’m constantly amazed at how powerful and friendly Bridge can be. One of these days I’ll take Lightroom for a test drive, but I’m still waiting for somebody to convince me that it’s leaps and bounds better than the Bridge/ACR combo.
Antoine Khater
March 26, 2008Great series Brian!
Although I am a regular Bridge user I’ve, somehow, missed the renaming option. I use a custom script with ExifTool for that.
Thank you for the effort.
Brian Auer
March 27, 2008The renaming thing could be handy, but I prefer to have more options than what it offers. The batch rename function is seriously better than what’s offered in the import dialog. I’ll cover that one in the next article.
Susheel
March 27, 2008Brian,
The Batch rename and the labeling and sorting options are what make me go to bridge these days. No, Lightroom is not “leaps and bounds” better than the bridge/ACR combo, but for some things, the process is much shorter. Plus there are some options that are not available in Bridge / ACR.
PShorten
March 27, 2008Great series – Can’t wait for the next exciting installment.
Thank you from a new-to-Bridge photo junky!
Patrick Nicholas
September 18, 2008Is there a tip for importing only additional images from a card that has been previously imported thus avoiding importing duplicates
Brian Auer
September 18, 2008Not in the way you’re looking for. Bridge has no “memory” of what’s been imported and what hasn’t. You just have to be mindful of what’s on your card and what you’ve already imported.