Organize: Part 3 – Seeing it Through
Here's another guest post from our buddy Neil Creek — fellow blogger and photographer from the land down under.
We continue on our journey to image organizing bliss, picking up where we left off last time, in the middle of a walk-through of my image workflow. If you're joining us for the first time with this post, I'd like to recommend you start at the introduction first.
I'd also like to reiterate that I am not an expert in image management or even in organization. I have been taking a huge number of digital photos for over five years, and as a matter of necessity and through trial and error I have come up with a system that works well for me. It is this system that I describe here in the hope that others will be able to benefit from what I have learned. Please take from this whatever works for you and adapt it to your own style.
FOLLOW THIS SERIES OF ARTICLES!
BACK — A WAY OF THINKING
Below is a timeline of my typical workflow. The sections at the top were covered in part two, and you can click on the links for those steps and you will be redirected back to the previous post. The second half of the workflow is discussed in detail below.
Sections in grey were covered in Part 2.
 |
Take the shot | Click! |
 |
The card fills up | If I'm shooting in the field I copy the card to my portable storage device. |
 |
Once at home | Create a new directory on my RAW hard disk drive and copy all files there from the card/portable HDD. |
 |
In the new directory | Copy all the files from the auto-generated sub-directories into the new top level directory and rename them all. |
 |
Load up Lightroom | Import all the files (into whatever RAW processing/image editing software you prefer), applying what metadata you can on the way. |
 |
Process | Delete the duds, flag the picks and process. |
 |
Additional metadata | Assign more detailed and descriptive metadata to the picks of the shoot. This is where I need to make the most improvements to my routine. |
 |
Preparing for output | On my DERIV HDD, I prepare a new directory. |
 |
Export | Using my preferred settings for the intended use, I export all the photos I want. |
 |
Share | Upload, email, burn or otherwise disseminate the images. |
 |
Backup | Automated software mirrors all changes of my entire RAW and DERIV HDDs every night for a current backup. I still need to implement an off-site backup but this would be a relatively simple additional step. |
 |
Retreival | With the directory and file naming schemes I use, finding the images I'm looking for is usually very simple. Because my metadata routine is imperfect, finding images based on concepts is a little tougher. |
Lightroom Catalog Size
A point I forgot to mention in part 2. My preferred RAW processing tool is Adobe Photoshop Lightroom. This application uses a catalog system to manage images, thumbnails, metadata, processing settings and more. The advantage to this approach is the speed of viewing and searching gained by keeping a database of thumbnails and metadata, and other benefits. The cost is that the catalog needs to be loaded and modified whenever changes are made to a file.
The number of photographs I take is considerable, and growing. This leads to very large catalogs after a while, and the performance of Lightroom suffers badly. My solution to this problem was to use several catalogues grouped by date. For each quarter of the year I make a new catalogue. This keeps their sizes manageable enough to optimize performance. The problem is that I can't search my entire collections of photographs at once. Until computer performance improves sufficiently to eliminate this problem, the compromise will have to do.
Preparing for Output
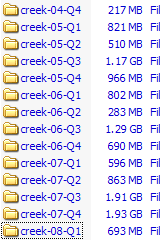
I discussed my hardware setup in part 2, describing the RAW/DERIV hard disk drive (HDD) system I use. The directory setup I use on the derivative HDD is similar to the one I use on the RAW HDD. The only difference is I group the directories into quarters.
For the same reason that I split the Lightroom catalogs by quarter, I do the same with the derivative files. A huge list of directories, one for every day I have ever taken a photograph, can take a very long time for a file manager to display. I keep the current quarter's photos in the top level, but every three months I create a subdirectory named for the quarter and copy those files into that. I name these directories like this: creek-07-Q4, creek-08-Q1 etc
When you're exporting RAW files, the method can change significantly depending on the final use you have for the images. Are they being printed? Are they going to be uploaded to the web? Are they to be elements of another image, such as a panorama? Depending on the use, I will put the output images into different directories. Below are some examples of these:
Output subdirectories
- none
- If I wish to output the full size image, I will simply export the file to that date's directory.
- web
- If the file is destined to be posted online, or sent to friends via email, it will be redirected to a subdirectory of that date called “web”.
- pano elements
- Photos to be compiled into a stitched panorama.
- hdr elements
- Exposure bracketed images to be merged into a high dynamic range photo.
- 3d elements
- Pairs of photos for 3D stereoscopic images, or the split photos taken with the single-shot Loreo 3D lens that I own.
- focus elements
- A series of photos taken with slightly differing focus points for focus stacking, most commonly for macro photos.
- astro elements
- A series of photos taken of a night sky subject to be stacked in order to increase brightness and eliminate noise.
- etc
- You can create any subdirectory as a temporary holding place for photos to be used for other purposes or in any kind of composite or multiple exposure image. Typically for “element” photos, once I've generated the final composited image I delete these subdirectories and their contents. I still have the RAW files and can re-generate the elements any time.
Exporting photos
The settings I choose for the exporting of photos depends a lot on what use I intend for them to have. The vast majority of the time, they will end up being uploaded to the web or sent to friends via email. Other times I will be exporting full-res photos for printing, or creating a sequence of images to be combined into one, such as with a panorama.
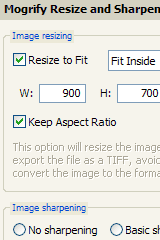
What sizes, file formats and compression ratios you choose for your output files is entirely up to you and will depend on your personal taste. I have, however, recently found a very helpful Lightroom plugin for producing web-ready photos. It's called LR/Mogrify and it lets me apply output sharpening and a custom watermark to the image upon export. This negates the need to load the image into Photoshop for any reasons other than specific patching/touch-up work.
If the photos are destined for Flickr, then I take a bit of extra time to keyword the images now. I was keywording the photos after I uploaded them to Flickr for too long before I realized my mistake. If I keyword the raw files, they will stay with the image in the metadata, and already be there in Flickr when uploaded. They'll also be there for any other use I have for the image, and make it easier to find later. If I wait till the photos are on Flickr to tag them, only that copy of the image has them.
Completed composites
If the exported images were elements of an image to be composited, it is now that I load the relevant software to bring them together. These processes would best be described in a series of posts relating specifically to the topics, but in short I use the following software for the various composites I create:
- Panoramas
- PTGui and Pano2QTVR
- HDR
- EnfuseGUI
- 3D photos
- StereoPhoto Maker
- Focus stacking
- Combine ZM
- Astrophotos
- DeepSkyStacker
Once the relevant fiddling around has been done, I end up with a single composite image. This resulting image is named the same as the first image in the sequence with a context appropriate suffix added. These include:
Output filename suffixes
- -pano
- A stitched panoramic photograph.
- -hdr
- A merged or tone-mapped high dynamic range photo.
- -3d
- A combined and “framed” 3d stereo pair.
- -focus
- A focus stacked image.
- -astro
- An astrophoto.
- etc
- These completed composite images are usually stored in that day's top level directory. If I need to downsize the results of other uses, such as the web, I'll place the modified copy in the relevant subdirectory. These suffixes will stay with the composited image from this point on.
Backup
By this stage, I've completed all the work I will do on a particular image, from pressing the shutter to sending it to its final destination, whether online, to a friend's email or sent to the photo lab. But I can't forget about the image yet. It's still vulnerable, as there is only one electronic copy of it in existence. The file needs to be backed up, but there's one other step first.
I'm a big fan of the DNG RAW format, and the many good reasons to adopt it have been mentioned online in various places. For my purposes the main reason to use it is to keep all the metadata Lightroom creates about a file embedded within it. Any edits I make or keywords I add are kept safely and securely with the photo.
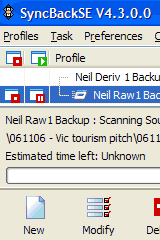
With the photos converted to DNG I'm ready to back them up. That's usually when I head off to bed. Using another great little tool called SyncBackSE, my primary HDDs, both RAW and DERIV are mirrored each night to their backup disks. The oldest backup I have is only ever 24 hours old. This brings great peace of mind.
There is only one problem that gives me the cold sweats: I currently don't have an off-site backup. In the event of a fire, or theft, my photos are not protected. There have been higher priorities for our limited funds for a while, but I know it is very important that get a very large HDD to which I will copy every file I couldn't stand to lose. I'll then store this at another location, probably a parent's house. No less often than once a month I'll get the disk back and update the backup with my new work. Even though the odds of total loss are slim, till then I still feel a little nervous.
Retrieval
Due to the care I've taken to use descriptive, consistent file and directory naming conventions, and my increasing emphasis on good keywording practice, finding an image I want isn't too painful. If I have a specific image in mind and I know the approximate date off the top of my head, I can typically find it within a minute. Looking for images that match a certain concept is harder, as my keywording is incomplete, however it is MUCH faster than having to scroll through thousands of disorganized thumbnails in an image browser.
The main difficulties I face with image retrieval at the moment are caused by the segmented Lightroom catalogs, which require the whole application to be reloaded just to check them. I'm hoping with my next future hardware upgrade, that problem will be but a memory.
Group wisdom
Now that we've gone through my workflow, I really want to hear what you think. For the final part of this series, along with links to useful resources and a look to the future, I'll be calling upon the group wisdom which has been shared via the comments on this series. I want to hear from you and here are a few questions to consider:
- Have any of you used any suggestions from this or the previous part to organize your photos?
- How have you adapted them to your workflow?
- Do you have any great tips or suggestions for improvements?
- What do you think is the single most important thing to include in an image management workflow? Consistent naming? Backup regime? Something else?
- What is the most difficult part of your workflow? Keywording? Search and retrieval?
- What strategies or techniques have you used to make organization your way of thinking?
- Do you have any valuable resources to share, such as book titles, web sites or software?
- What do you think is in the future for image management?
- What one technological development do you think would have the greatest impact on your organization routine?
I look very much forward to hearing your questions and comments.
See you in part four!
FOLLOW THIS SERIES OF ARTICLES!
BACK — A WAY OF THINKING
skedonk
February 4, 2008DVD/CD backup
Thanks for the details on the workflow. WRT the backup, let me just add a useful utility called QuickPar. It stores Error Correcting Codes for every directory you point it to and so can help recover corrupt and missing files later. It can also be used to verify the consistency of the data. Without consistency, you could be backing up corrupt photos without even knowing.
I am also interested in backing up to optical media since it isn’t sensitive to magnetic interference. Can you recommend a piece of software that will take directory tree (~200gb…) and will copy it successively onto DVDs? That is, fill each disk with directories and files until it is full then request the next one. All solutions I found rely on some special file formats on the DVDs, which means that the same software is needed for recovery. This assumes that their software will actually be available when the disk is read.
Thanks.
Brian Auer
June 19, 2008It didn’t… Neil has been quite busy lately, but I’ll see if he’s up for the task.
Chris Bishop
June 19, 2008Did part four ever materialise?
Great so far
Chris Bishop
David Rabkin
June 22, 2008Neil,
Great articles, thank you! I use naming method similar to your about 4 years. I do not use any organization software. The strong naming system works for me very well. I’d like to notice some points:
1. I use full year format in names like 2008, because I have scans from 20th century and they have 199x prefix. Another thought that maybe my son and grandson will continue my archive 🙂
2. I like you idea about adding author name to the file name. Probably I need to do it also.
3. For remote backup I use TWO external drivers. Then at every moment I have remote copy. If you use single external driver a thief can grab all devices at the night you do backup.
Again thank you very much,
David
Per
June 23, 2008Thanks for the great article series!
I often travel with both a DSLR and a compact camera. I’ve previously imported my photos from my cameras into the following structure:
photos//year-month-date/whatever-sequencenumber-the-camera-was-set-to-use.ext (jpg/CR/CR2)
Example:
photos/450D/2008-05-22/IMG_0005.CR2
photos/A710IS/2008-05-22/IMG_0555.jpg
I will move to a new structure with the year a a first sorting directory and also include a event description after the date, but I still think that I want to kept track of what camera that was used. I’m thinking about adding the camera model as a prefix to the imported file, e.g.
photos/2008/2008-05-22-event/450d_IMG_0005.CR2
photos/2008/2008-05-22-event/a710is_IMG_0555.jpg
Any other ideas on how to organize imports from multiple cameras?