The Top 5 Black & White Photography Tips
Black & white photography, for me, is one of the most interesting and inspiring aspects of this art form we call our hobby and passion. It's raw & refined, natural & unusual, bold & subtle, mysterious & open, emotional & impassive, simple & complex, black & white & everything in between. The monochromatic image has been with photography since the beginning, but what began as the only way to capture images has turned into something much deeper.
Want more great projects, amazing photos, Photoshop tips, and articles on photography? Subscribe to Epic Edits today (free!) so you don't miss a thing.
Interested in stepping-up your black & white game? Here are five tips to get you going in the right direction. If you want to learn more about the actual black & white conversion process in Photoshop, see my past entry that lays out 12 Ways to Make a Black & White Photo.

PRACTICE PRACTICE PRACTICE
An experienced black & white photographer can see the world without color. They've trained their mind to pick up contrast and tone while blocking the distraction of colors. This isn't a skill that you can pick up in a short amount of time; it's something that comes naturally in time. I can't say that I'm gifted enough to have monochrome vision, but I have been able to notice certain scenes and subjects that would lend themselves to black & white.
One way to help train your brain is to make a conscious effort — in other words, practice. Trevor carpenter gave us the perfect example when he started his October Challenge. Basically, he decided to limit his photography to black & white for an entire month. This gave him a chance to experiment with the medium and learn from his own work, and in his project recap he states “I have found, especially in recent days, that as I’m shooting and conceiving a shot, I see the potential impact of the composition in black & white.”

FOCUS ON CONTRAST
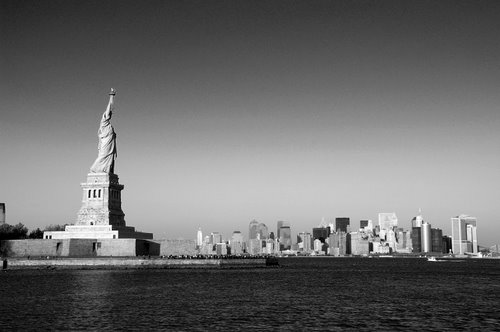
Black & white photography is about the black, the white, and all the tones in between. The human eye is built to pick up two things: light intensity and color. When you remove the color, your eyes become more sensitive to the light intensity. We naturally pick out areas of contrast — it's how we distinguish one thing from another. As a black & white photographer, your main objective is to make your point with shades of gray. Use contrast to show your onlookers what's important and what's not. Seek out scenes that naturally show signs of high contrast, and your black & white photos will be more compelling right from the start.
When post-processing a black & white image, the use of Photoshop techniques like levels, curves, and layer blends give you a wide variety of output options. In addition to these things, burning and dodging are highly effective methods of improving contrast. They work so well because they allow you to focus the edit on a localized portion of the image without affecting the surrounding areas.

FOCUS ON TEXTURE
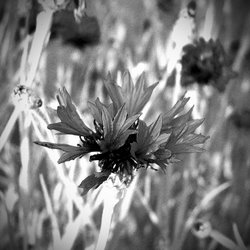
Texture is really just a form of contrast, but it is perceived quite differently. If you think about it, texture is the regular or irregular pattern of shadows and highlights at various intensities. Black & white photos really lend themselves to texture because color generally add another layer of complexity, thus masking most subtle textures. Look for areas of interesting texture that can be photographed by zeroing in on specific surfaces and examining them for signs of patterned contrast.
The choices you make in post-processing can really make a difference in the texture too. During the black & white conversion, you can usually pull texture out of otherwise smooth surfaces based on your choice of conversion methods. In digital photos, blues and reds generally contain more noise than greens, so tools like the channel mixer and the black & white adjustment layer in Photoshop can really accentuate those embedded textures.
CAPTURE IN COLOR
This is mainly aimed at digital photographers… If your camera gives you the option of shooting in color or black & white, NEVER shoot in black & white. The camera is really capturing color, then converting to black & white. Photo editing software can do a much better job at the conversion, and you'll have more flexibility on the output of the final image. It's really amazing how different a photo can look solely based on the post-processing, so it's best not to limit yourself before the photo even makes it out of the camera.
The one exception to this rule is if you wanted to use the black & white capture to give you a preview of what the scene might look like as a monochrome image. It may help you identify good black & white scenes more immediately, but once you find your shot switch back over to color capture and shoot it again.

USE COLOR FILTERS
Black & white film photographers make use of color filters to change the captured tones in their photographs. Ever see those monochrome images with dark skies and puffy white clouds? That's not natural; it requires the use of color filtering to produce the desired effect.
Using an actual color filter with a digital camera is perfectly acceptable and it has its merits, but it's not completely necessary. Software like Photoshop has the ability to apply non-destructive color filters. It also has the ability to produce the same results as a color filter during the black & white conversion. For those of you using Photoshop CS3, you'll see that the black & white adjustment dialog has several preset filters that can be applied and modified to suit the photo.
So if you're interested in pursuing a little black & white photography, really think about these things — before, during, and after you shoot. Anybody can produce black & white photos, but it takes a little more thought and skill to produce good black & whites.
Want more great projects, amazing photos, Photoshop tips, and articles on photography? Subscribe to Epic Edits today (free!) so you don't miss a thing.
Trevor Carpenter
November 5, 2007Brian, I am honored and humbled at your reference to my October Challenge. That experience was one of the most challenging and rewarding personal projects I’ve ever attempted.
Thanks for the mention.
Brian Auer
November 5, 2007No problem dude. That was a really cool idea you had, and you stuck to it through the whole month with some really great results throughout.
libeco
November 5, 2007I must say I don’t really like b&w photo’s. On rare occasions I like b&w, mainly when seeing them in HDR, or with extreme contrast/detail shots. Just a matter of taste I guess…
Brian Auer
November 5, 2007Oh, now you’re going to hurt my feelings. How can you not like b/w? It’s classic! Maybe I’m just a freak, but I have a huge soft spot for black & white photos. I’m not to the point where I won’t look at or shoot color, but I definitely prefer to look at the monochromes. I even subscribe to “B&W” magazine — it’s filled with awesome photos.
libeco
November 5, 2007Sorry, perhaps I’m too young, lol. I think 90 % of the b&w I see is just there because it is b&w withut anything interesting. It’s like making a HDR-image without an interesting picture, just because of the technique…
Brian Auer
November 5, 2007I know what you mean — bad photos can be without color too. For as much as I love b/w, I don’t do a whole lot of it. I generally only do b/w if the image really does look better without color. But then, that’s the point of the article — there’s a lot more to black & white photography than just the removal of color.
the_wolf_brigade
November 5, 2007I love black and white to the point where I don’t even buy colour film anymore. I’m hooked – even more so after taking on board Trevor’s challenge. I learnt so much in the past month.
While I always shoot (on film) with a red 25A filter for extra contrast, I read recently that if combined with a circular polarizer (CP) the effects can be mind blowing – particularly for skies. As the CP is one of the few effects that cannot be truly imitated in Photoshop or similar programs, I would imagine that this advice would also apply to digital. ie. Shooting with a CP then converting to b/w with one of your aformentioned techniques should give increased dramatic contrast.
@libeco: To a certain point I must agree with you. Until recently (when a friend made some suggestions) I too was making bad b/w images with limited contrast. I think for a b/w image to be good the contrast is vital purely because it acts as the ‘colour’ in the image. This is evident in all Brian’s photos in the post. On Flickr search for ‘Rui Palha’. IMHO he is the master of contrast.
@Brian: One more suggestion for a tip would be composition. While texture in a b/w photo allows complicated compositions, if there is limited texture then it seems to become even more important to chose a subject that works in isolation. Your photo of the steps as well as the ship are prime examples of this. While there is limited texture, the simplicity is strong and really highlights the main subject.
Brian Auer
November 5, 2007Great advice on that CP filter — they’re handy for b/w and color alike. And composition definitely plays a role in black & white photography. I suppose I didn’t mention it because I feel that it should apply to all photos as the most basic and primary rule for better photos. In my mind, composition is the foundation that a photo is built upon.
Big 40wt Svetlyak
November 5, 2007the_wolf_brigade: You should try a Neutral Density Gradients (NDG) too, they are very helpful especially for landscape photography. With help of one or more NDG filters, you can decrease the scene’s contrast, if it is more then dynamic range of the medium.
Big 40wt Svetlyak
November 5, 2007@Brian, can I translate these tips to russian?
Brian Auer
November 5, 2007Sure thing. Just remember to give credits, and feel free to add your own thoughts to it to make it more of your own.
inspirationbit
November 5, 2007there’s something magical about b&w photography – it sets a different mood and deep in our mind we do see a b&w photo in colour, but then it’s up to our imagination to apply those colours. It’s just like watching those b&w movies. You can always tell if someone’s eyes are light blue on a b&w photo, even if you don’t see them in colour.
P.S. Btw, I really like your blog’s new look, Brian.
Brian Auer
November 5, 2007You’re darned right it’s magical, Vivien. I really (hopefully) don’t see black & white photography dying out the way it has in the movies — it’s so deeply rooted in the artistic side of the medium.
Trevor Carpenter
November 5, 2007@libeco: I must say that I too had a limited view of B&W photography. That’s one of the reasons I lead the October Challenge. Knowing that B&W photography is fundamental to the photographic learning process, I knew that I’d need to embrace it before I was able to grow in my photography.
I plan to tackle new challenges in the future. Mainly, I want to challenge myself to shoot techniques, methods, and subjects that I don’t like to understand. By doing this intentionally, I hope to expand my skill and understanding of a balanced photographer.
Brian Auer
November 5, 2007Cool, any ideas for what’s next on the list? Street photography, people photography, macro photography?
gregor
November 5, 2007really nice article .
the pictures used to illustrate the topic are fantastic.
black and white fascinates me ever since. for me it is hard to shoot in color by now because i always think i can get more out of an image when converting it into b&w.
| GW |
the_wolf_brigade
November 5, 2007I’m up for some more challenges too.
Ed Z
November 6, 2007Another great article! I love Black and White photography, I find it has a certain simple beauty that moves me. I started off shooting black and white film, I dont think I ever even shot color film. (that’s not true, I did, but rarely!)
I keep wishing for a DLSR with a dedicated black and white sensor (since it would not need a bayer array or whatnot it could provide a ton more detail/resolution from the same number of pixels)
but for the time being, it’s fun to play with B/W conversions!
Brian Auer
November 6, 2007A black & white sensor would certainly be interesting — it would require more work to get the capture right since you wouldn’t be able to play with the color channels after the fact. But it would certainly provide better pixels since you could avoid interpretation.
Markus
November 6, 2007Great tips. It’s all about contrast contrast contrast. The 12 ways link is really helpful too.
Beyond Megapixels
November 9, 2007Great tips! Thanks for this.
Fubiz
November 15, 2007Very nice article. Good tips!
Dave Mac
November 17, 2007I too love B&W, in fact to the point that I have a separate profile on Flickr (Colour Void) for my B&W photos. It is so unique unto itself in not only appearance, but technique, that it is a different art form when compared to colour photography. At least in my opinion! 🙂
Ferd Randa
February 21, 2008very nice article, i am newby in B&W Film Photograph, can anyone give me a tip? what ISO is Best for Black & White Photo using a Film?
thanks!
Jessica
April 30, 2008Would it be possilbe if i could use your tips for a presentation (speaking and listening) in my english. I chose photography for my subject because i just love it. But i only would like to borrow a few of your sentences because i agree completely. I’ll do the rest myself. Thanks x
Brian Auer
April 30, 2008Sure, no problem. Just let people know where the material came from.
Juan
September 24, 2008could i use some of your sentences for insparational purposes
i will leave all credits to the creator.
I share the same passion for black and whites.Thanks
juan
kriz cpec
September 27, 2008just saw this article over at blog for photo nerds. congrats.
pic_chick
September 28, 2008i love b&w pics. i think most of them make the picture have more depth to them. i love all of the them posted above. nice work <3
pSQUARED
February 2, 2009I’v just started B&W photography and i love it!!!i’m totally hooked.i think this blog is a great place for tips.thanx Brian.cheers.
Tips Photo
February 6, 2009I love black and white photography. Thanks for the tips.
Nancy
February 18, 2009these are some excellent black and white tips. What I do is tend to capture in color and then do the change. The best tip you presented here is the "practice practice practice" one. Thanks.
themisfit
February 22, 2009Great article with a number of great tips. B&W is definitely an art form.
Albert
April 3, 2009I love black and white pictures. For some reason, it always brings out that vibe that is most appealing to me. It gives it more emotion and feel to it. Great captures by the way.
Rehan Ahmed
April 14, 2009Great post with lot of information and tips like always … you are simply awesome
lukix
May 10, 2009I use only UV and Polar filter to do my B&W photos. Later I use Adobe Lightroom to edit
Jason
June 19, 2009Great tips and thanks for posting. I prefer to shoot in colour and change to black and white in Photoshop as it gives you more room to maneuver with tones. Adding a fine texture here and there can also enhance certain monochrome images.
Marcus
June 24, 2009USA 2009 B&W : https://www.flickr.com/photos/marcusrevertegat/sets/72157619390872360/show/
Tom Stappers
September 25, 2009Thanks for promoting black & white photography. From the reactions I even understand that you have introduced some newcomers to it, which is great! Personally I have always done b&w film photography and still do, so I hope it will be around forever (including the hardware etc.). So practically speaking, every enthousiast helps, even though for the moment some are using digital only…
Tom Stappers
September 25, 2009By the way, now’s the time to buy a high end film camera, because quite a few photographers exchanged their analog camera’s for digital camera’s, so make your choice!
Amit
January 7, 2010great tutorial..would like to know abt shooting in RAW..the picutre of the flower in b&w is too good..
http://www.shariblog.com
themisfit
March 14, 2010great tutorial. thanks for posting.