Rainbolt
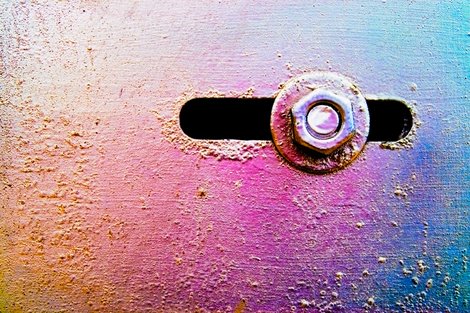
I uploaded this photo to Flickr and Zooomr last night, and people seemed to be very interested in how I got the colors to show up the way they did. Before I get into that, here's the background on the photo. I took this during my solitaire photowalk in Del Mar while I was trying to get shots for my “Minimalism in Photography” project entry. This particular photo shows part of a railroad crossing gate. I chose this composition because it had some fairly simple geometries that stuck out, plus the painted texture was really neat. What I didn't expect was for this to be a colorful photo, but hey… whatever works.
Now for the fun part. I processed this photo in two stages: once in LAB and once in RGB. Both started with processing in ACR, but with different settings. If you click on the photo above, it will show a much larger version. It's 300 pixels tall and nearly 1MB, so you might want to open it in a new window or tab so you can follow along with the steps below. The JPEG (1) is shown at the left, and each sequential step is shown to the right of the previous step. You can see that the JPEG is quite dull and almost monochromatic. In fact, I was planning on just doing it as a B&W since it was nearly there anyways.
In ACR, I adjusted the exposure to widen out the histogram a bit. Although I was pretty sure it was going to be a B&W photo, my curiosity forced me to play with the Vibrance and Saturation adjustments. I found that cranking these settings up brought out a little unexpected color. So I pushed both of them to 100% (not usually recommended) and opened up the image in LAB Color Mode (2). The colors were there, but so were some color artifacts — since I was interested in the color rather than the texture and luminosity, I ignored the artifacts. The first thing I did in LAB was a Levels Adjustment (3) by bringing the black point up to 40 and the white point down to 215 on the “A” and “B” channels only. This is a great method to increase saturation without introducing any further artifacts. Then I did a Curves Adjustment (4) on the “Lightness” channel with a slight “S” curve to further bring out the appearance of saturation. And to get rid of the saturation artifacts introduced from ACR, I blurred the entire image with a Gaussian Blur (5) at 9 pixels. Why blur it so much? I wanted the colors, not the textures — I could get the textures back by re-processing the RAW file. How do you get the colors from this one onto the texture from that one? Read on.
Once again in ACR, I adjusted the exposure to widen out the histogram and increase the contrast. I brought up the Vibrance to 25% and the Saturation to 10% this time (which is a more acceptable level to work at) because I still wanted a hint of color to start with. Then I opened it up in RGB Color Mode (6). I brought in the blurred layer from the LAB file, laid it over the RAW conversion, and set the Blend Mode to “Color” (7) at 100% opacity and 100% fill. This was the crucial step — it allowed me to keep the texture and exposure of the second RAW conversion while bringing in the color from the first conversion. After this, I used a Curves Adjustment (8) to bring out the color and contrast a little more. Then a duplicate of the results was applied with a Hard Mix Layer Blend (9) at 25% opacity and 14% fill to bring out even more contrast and color. At this point I decided that was enough color boosting, so I sharpened it up with the Unsharp Mask (10) at 75%, 1.5 pixels, and a threshold of 0.
So that's all there was to it. No sweat. At any rate, the moral of the story: experiment with your photos, push the limits, and get creative. If I just went straight to B&W, I don't think this photo would have turned out as interesting as it did. As for where the colors came from in the first place — I have no idea. My guess is that there was some type of oily film on the painted surface and it just wasn't obvious with the naked eye.
** You can also see this photo on Flickr and Zooomr **
Photo by Brian Auer
09/22/07 Del Mar, CA
Rainbolt
Konica Minolta Maxxum 7D
Konica Minolta AF DT 18-200
90mm equiv * f/6.7 * 1/350s * ISO100

Brian Auer
December 20, 2008I tend to keep up with the upgrades, so I’m now on CS4. This photo was probably created with CS3.