Warning: These 9 Photoshop Techniques May Result In Great Photos
Want more great projects, amazing photos, Photoshop tips, and articles on photography? Subscribe to Epic Edits today (free!) so you don't miss a thing.
Post-Processing (or photo editing) is what makes a good photo great. Cameras produce a good starting point, but post-processing is where the magic happens. If you're feeling a little bored with your current arsenal of Photoshop techniques, try out some of these creative post-processing tricks to boost your artistic style.
-
High Contrast Color
Boosting the contrast in a color photo can produce some stunning results. Bump up the contrast, play with the colors, and add that sort of “grunge” mood to your photo.
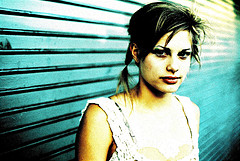
Photo by kk+. Kris Krug is also a
great Vancouver Fashion Photographer -
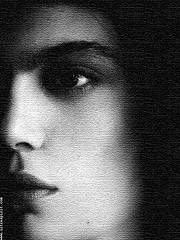
High Contrast B&W
I love black & white photos, but I really love a good high-contrast black & white. This method creates a focus on the shapes, lines, and patterns rather than the tones. Also be sure to read my other black and white photography tips.
-
High Color Saturation
One way to make your photo “pop” is to really push up the color saturation. Just be mindful of color clipping and banding if you push it too far.
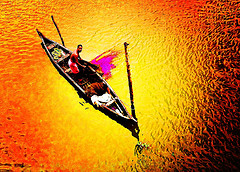
Fishing Apocalypse by Anoop Negi
Anoop also has a photography blog -
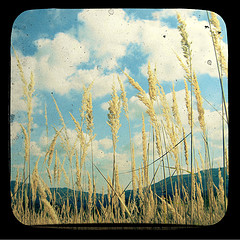
Vintage Look
Making a photo look older than it really is gives it a lot of character and mood. To get this look, you can toy with color saturation, color tinting, and adding imperfections.
-
Lomo Look
The real lomo photos have a very distinct look to them, but it's a look that can be replicated through post-processing. They tend to be saturated in a very interesting way.
-
Oversharpen
Most photos need to be sharpened anyways, but some photos can actually benefit from oversharpening. This method gives the image a “harder” look and feel.

Blown by Brian Auer
You're already at MY blog! -
Texturize
Overlay texture to bring in subtle elements to your image. It's a great way to deal with flat and bland portions of the photo by introducing detail and complexity into it.
-
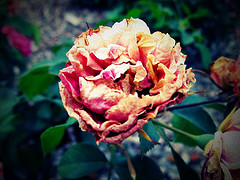
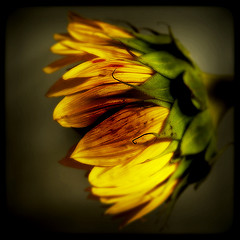
Add Vignette
Some images really stand out with some applied vignette. It helps create a natural frame around the image and it draws the eye toward the center of the photo.
-
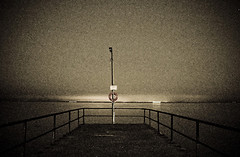
Add Noise & Grain
This is another way to spice up the bland parts of your image. Adding noise or simulated grain adds texture and feeling to a photo, and can sometimes produce very “gritty” results.

As you can see, many of these photos apply multiple Photoshop techniques in addition to other techniques not listed here. So if you see a photo that intrigues you, ask yourself why. If you like it partly due to the post-processing, try to imitate the technique on your own photos.
And as for how to do some of these things… maybe we'll save that for another day (update: I've actually added links to each of the main points).
If you enjoyed reading this article, take a look at the other Photoshop Tips in my archives.
Want more great projects, amazing photos, Photoshop tips, and articles on photography? Subscribe to Epic Edits today (free!) so you don't miss a thing.
Andrew Ferguson
September 17, 2007Great post Brian! Looks like we’re thinking along the same lines again. After I got off the phone with you last night, I took a break from Warcraft and worked on a draft in my queue about photoshop effects.
The difference? My post will be on effects that *won’t* save your photo 😛
Let me know how WP-Cache works out for you, I’m curious to hear.
BTW, what do you think of BlogRush so far? I like it, but the lack of stats is driving me up the wall. I can’t tell if I’m getting hits yet or even if anyone signed up via the referral links I used 😛
Brian Auer
September 17, 2007Great minds think alike. Your article sounds intriguing.
The wp-cache plugin seems to be working correctly, and so far my hosting company hasn’t shut anything down after a bit of traffic this morning. I hope it will buy me a few months before moving up to a semi-dedicated or dedicated server.
I’m not sure what to think of BlogRush yet — it has potential to be effective. I like the fact that I’m seeing relevant articles show up, and that’s the only reason I’m leaving it up for the time being. Just looking at my own stats, I’ve had 5 visitors today from the widget. It’s not huge traffic, but it’s better than nothing.
Brian Auer
September 18, 2007WOW! This post has created quite a stir in the StumbleUpon community (thanks for submitting the article Darren, and thanks to all the great Stumblers out there). It’s even made it to the “Buzz” page for the “Photos” category.
No love from Digg though… what’s up with those people? Don’t they know a masterpiece when they see it?
inspirationbit
September 20, 2007This is a really good post, Brian. I think the trick here is not the knowledge of all those Photoshop techniques, but applying the right technique to a given image.
Most of the photos above look very natural, even though they’ve definitely been touched up.
Brian Auer
September 20, 2007Thanks Vivien, that was what I was going for — to inspire and spark interest, rather than teach the specifics of how to do each technique. This also gives me the opportunity to expand on these topics for future articles where we CAN get into the technical details.
Simonne
September 20, 2007Some years ago I used to think that other people’s photos were much better than mine because they had better cameras. I’m amazed what editing can do to a photo. I liked your examples very much.
Brian Auer
September 20, 2007I’m always quite amazed at the results of post-processing too, even with my own photos. It can make a world of difference if you know the right techniques and apply them intelligently.
Brian Auer
September 21, 2007Thanks for the interest, it’s good to hear feedback like this. I’ll try to keep it in mind for some of the future articles.
ajay
September 24, 2007This is a useful post as am just learning Photoshop…thanks for sharing:)
Naser
September 27, 2007Hi Brian. I really liked that high contrast B&W picture you posted on your list of photoshop techniques above. But the link associated with it leads to a page with 12 ways to make B&W conversion. I’m trying to find which one was used to furnish this particular photograph. Can you please mention which technique was involved?
Brian Auer
September 27, 2007The B&W photo belongs to Gregor Winter as stated below the photograph — you’d have to ask him. Any of those techniques could have been used for the B&W conversion, but the high-contrast part probably came from something like a levels or curves adjustment. Again, though, you’d have to ask him. I’ll drop him a note to see if he’ll share a few of his techniques for that one.
Gregor Winter
September 27, 2007hi Naser.
here is how i processed the “subway moment”.
programs used : lightroom and PS
in this one i knew before shooting that i wanted to create a b&w.
first of it is important to know how it was shot.
a look at the metadata reveals an effective focal length of 320 mm 1/25! sec f5,6 at iso 800!.
that was due to the slow lense used.
so i bursted some shots which were all 1 stop (or more) underexposed.
first i went into lightroom which is my raw processor of choice and started tweaking the hell out of my 12 bits of data.
since the shot was underexposed i “corrected” the exposure(+1,5) which pushed the grey tones more towards white and brought back some detail in the darker areas.
i created a slight s curve in lightrooms tonecurve panel.
then i desaturate all colors.
pushed the black slider up to 30
pushed the fill light up to 35
(by now the image already looks 90% of the final)
then (still in color mode!) go to the hsl panel and play with the luminance sliders-> this way you can localy lighten or darken areas of (what used to be) color.
then of course the usual adjustments like clarity vibrance hues etc(yeah hue even though its a b&w)
then in photoshop i usually do minor levels and curves adjustment but not here.
finally in every b&w i do some dodging and burning.
i create a new leyer-> fill it with 50% grey set blend mode to multiply and start dodging the lighter parts and burning the midtones and shaddows to create some more contrast locally
.that way it is non destructive and i can always go back.
——————
to sum it up:
-think bw while shooting.
-here undereesposing helped to keep the subjects well toned while the highlights(former midtones) almost blew out.
of course there are a lot of ways to achieve the same results.
and every photo requires different methods.
hope that helped you
enjoi shooting
gregor
Brian Auer
September 27, 2007Great stuff Gregor — thanks a lot for giving us some of your “inside” secrets for this outstanding photo.
James
October 8, 2007absolutely lost me at the first sentence: “Post-Processing (or photo editing) is what makes a good photo great.”
I could not disagree more.
Brian Auer
October 8, 2007Everybody is entitled to their own opinion. This is my own personal view on the matter, partly because I’ve never come across a truly great photo that was untouched by post-processing. And when I say post-processing, I’m including darkroom work for film photos. From what I’ve seen, cameras produce a great starting point, but I’ve never had an image come straight out of the camera ready to print.
Maybe you can change my mind on the matter — show me an amazing photo that absolutely couldn’t be improved by post-processing.
Lau
October 9, 2007Texturize is my favorite – I use it quite allot. Second place grain, third place high BW and oversharp.
As for no-processing photos, I’ve heared most of the National Geographic pictures are almost unprocessed and still fantastic – the secret is to use the right filter for each photo, and, to shoot at the right time of the day (natural morning light for example), plus, a good SLR as a tool – gives good sharpness.
bassel souliman
December 18, 2007Thanks for these images.
it’s so great
I’m so crazy about abstract images
Patricia Sanders
December 27, 2007Great tips! Thank you!
Jason Williams
January 20, 2008I’m looking forward to giving these a try, especially the high contrast color and b&w.
I really like the example photo of the sunflower for vignette, but I think it’s more than just the vignette that makes it pop. It’s the vividness of the colors against the muted background combined with the vignette effect.
Alan Cook
February 10, 2008My god! One of the best photography article that i have come across.
Impressive!
The Dino
February 11, 2008These are realy grat tips. Thanks for this work you do.
Kevin Dowie
April 25, 2008Some interesting effects here with good examples, thanks.
Ideas
May 1, 2008They are 9 great tips, thank you very much!
Its incredible what a powerful and amazing piece of software Photoshop is.
Dennis
May 7, 2008I came thinking I’d get a couple tips and found out I have a long ways to go in my Photoshop learning. Very good article. I’m your newest feed subscriber.
Seamless Gutters
June 29, 2008The high contrast color and the high color saturation, don’t even look like photos – they look more like art. I love it. Thanks for the great info.
Terry
August 2, 2008Those are some really nice effects and simple as well. To get some good results a picture has to be suited to the effect and that needs some experience.
Conscious
August 20, 2008Great post. You’d really be surprise what a little slight modification to a photo can to transform it from just okay to phenomenal.
Greek George
September 9, 2008I particularly like the vintage look. Its great for photographs taken in the fall. I will try and work with some of my photographs from my Fall trip to Athens Greece.
shail
November 11, 2008found this post really useful, i will definately try all these tips given by you and thanx keep writing more useful information
Ajith Edassery | Make Money Online
January 9, 2009Yet another great photoshop reference post. Off late, I have been doing some research on making some nice background for my twitter profile and newly purchased WordPress theme. Since I don’t have photoshop I am trying to do whatever is mentioned here in GIMP 🙂
Creating a logo is another task… I m going through your posts one by one at leisure, though the main focus is on editing digital photos and not necessarily logos/hearders
Bob Marvin
January 12, 2009Photoshop is an amazing piece of software. Would like to see more in depth how to’s on the techniques. This article is just scratching the surface of what can be done. I particularly like the high color saturation technique…of course they all have their uses and knowing when to use them is the key.
Dan
January 17, 2009Excellent post Brian. I really loved what you did with the B/W. I think bumping the contrast really makes it pop… Keep up with the great techniques…
Tony Lee
March 15, 2009I think B&W tweaking is great, it really brings out the "expression" of a photographer.
Photoshop allows us to bring so much more value to our work! The possibilities are simply endless.
Thanks for sharing your work.
George Packard
March 31, 2009I love experimenting with photoshop, there are so many features that are available. I’ve made a note of these and will give them a try!
Albert
April 3, 2009I recently got Adobe Photoshop and I got to admit, it is harder than it seems to make amazing pictures like you did. The contrast and the whole entire feel of the photo is amazing. I love the teal contrast that outlines her facial expression, which was just jaw dropping.
Rehan Ahmed
April 19, 2009very useful Photoshop techniques . honestly Brian I’m Learning A lot from you … and your blog is great institute for my kind of newbies
Tkaniny Obiciowe
May 7, 2009high contrast saturation MIGHT result in great effects but usualy it results in pretty unprofessionaly looking pictures. I belive you need to be really good at doing those to even start using this technique.
Yourmom
July 16, 2009LOL LOL ROFL ! U N00BZ0rZ get real cams and film and get some real photos instead of using ur pirat3d copies of stupidshop to make fake bullshit photos 😛
$60 cam + $1 xpired film >>>>>> $3000 digital SLR + pir4t3d software 😛 😛 😛 LOL LOL ROFL LOSERS NOOBS k3k3k3 ROFLMAO STFU
fat heads manchester
July 16, 2009Some great techniques, although I am always a sucker for the high conrast effects that you bring in here. The techniques are brilliant but it has to be said that your source material is very good to start with too.
leavesnbloom
January 30, 2010I really need to learn some more photoshop techniques after seeing what you have done here Brian. I’m just new to photography so your site is a great resource to me.
Kevin
April 24, 2010Some of these pictures look shopped. I can tell from the pixels and from having seen quite a few shops in my time.
Brian Auer
April 24, 2010LOL